1940 17 Chris Craft Barrelback 5200 Bottom Planking Update

1940 chris craft barrelback bottom planking

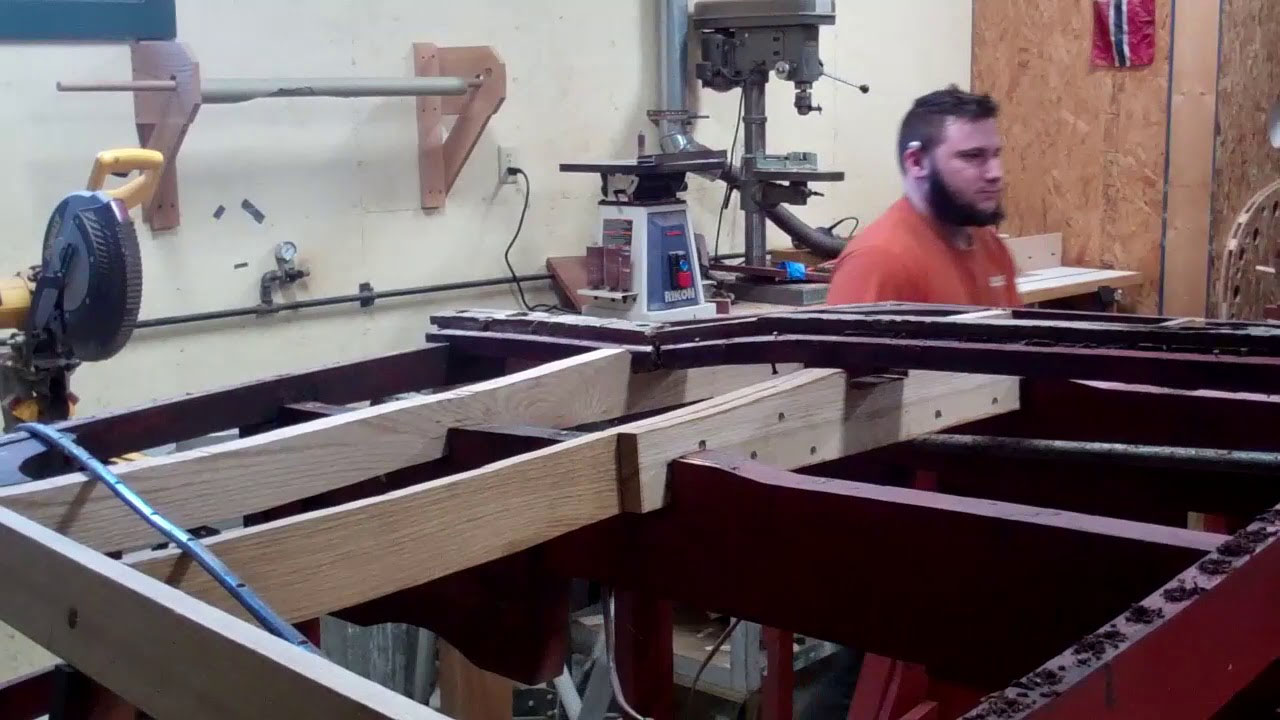
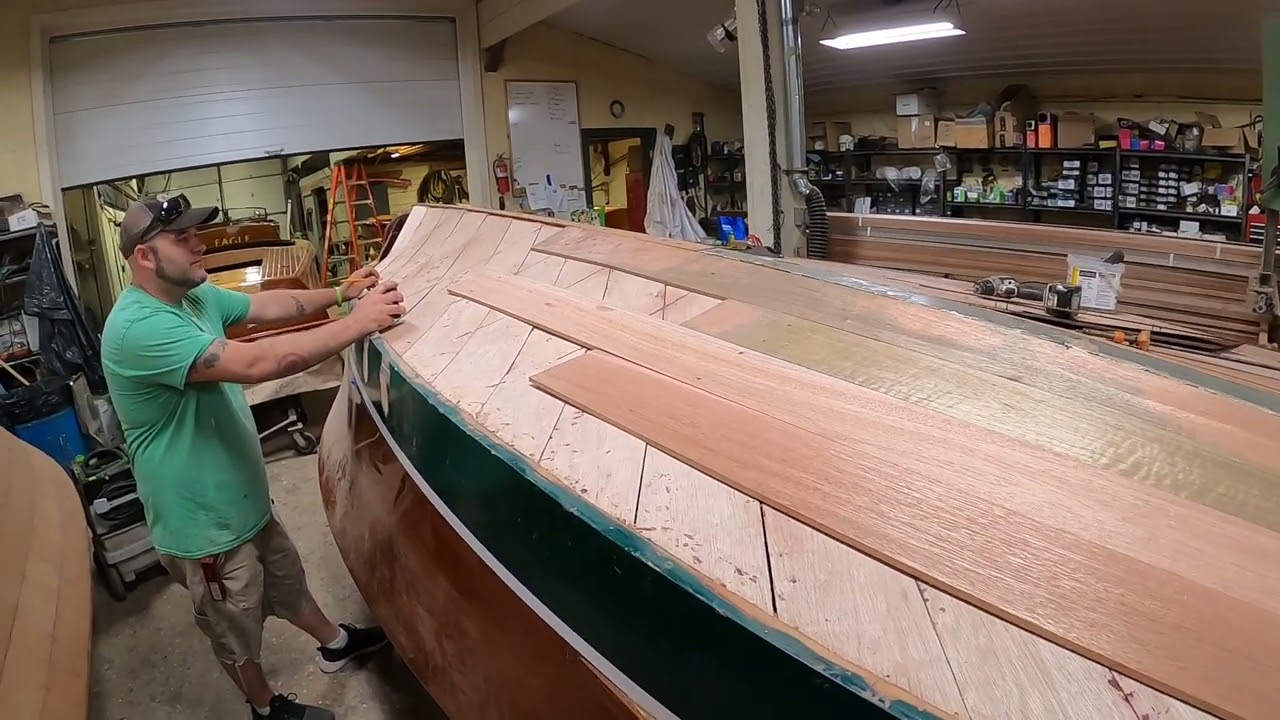
Priscilla, our 1940 17-foot Barrelback “lab rat” experiment is progressing rapidly now that we finally took delivery and milled the Meranti mahogany planking needed to complete her True 5200 bottom. As we shared in our last update, rather than install her inner skin using 6 mm plywood panels, we are reverting to what is a truly very old school alternative: replacing the inner skin using strips of planking laid at approximately 45 degrees to the keel.

In so doing, we will deliver a bottom, the inner skin of which precisely matches that installed in Algonac in 1940.

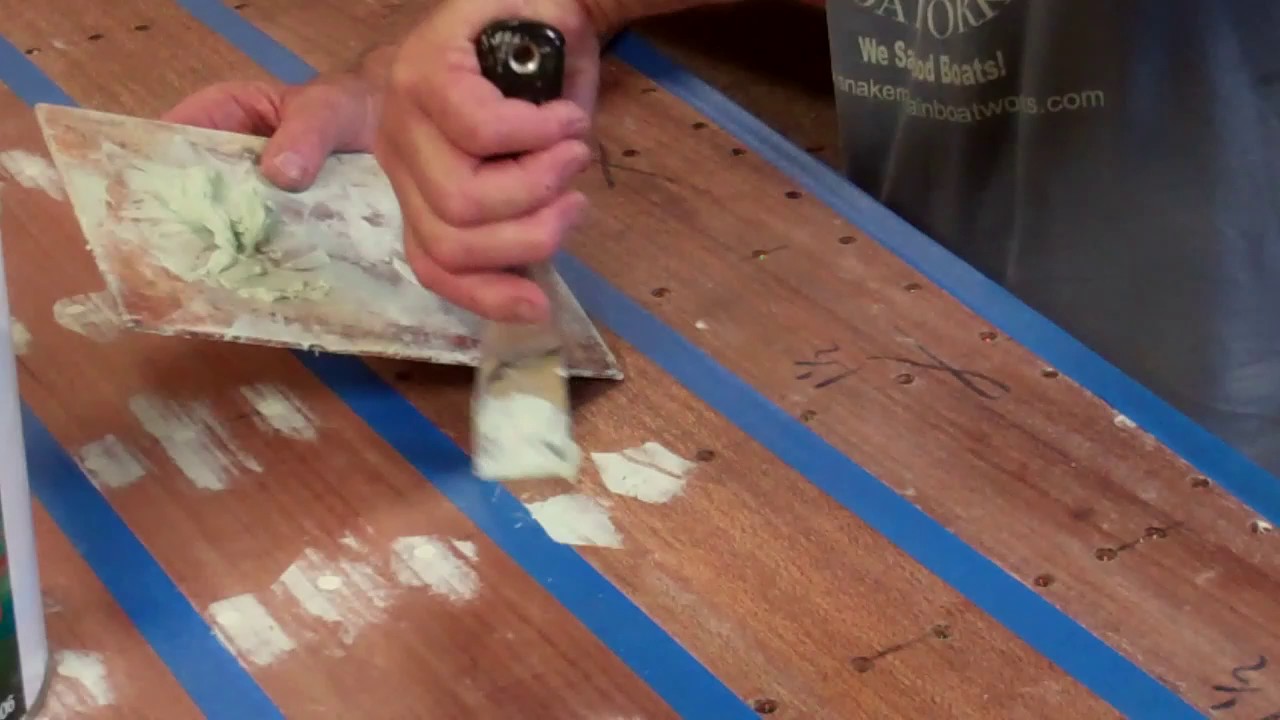
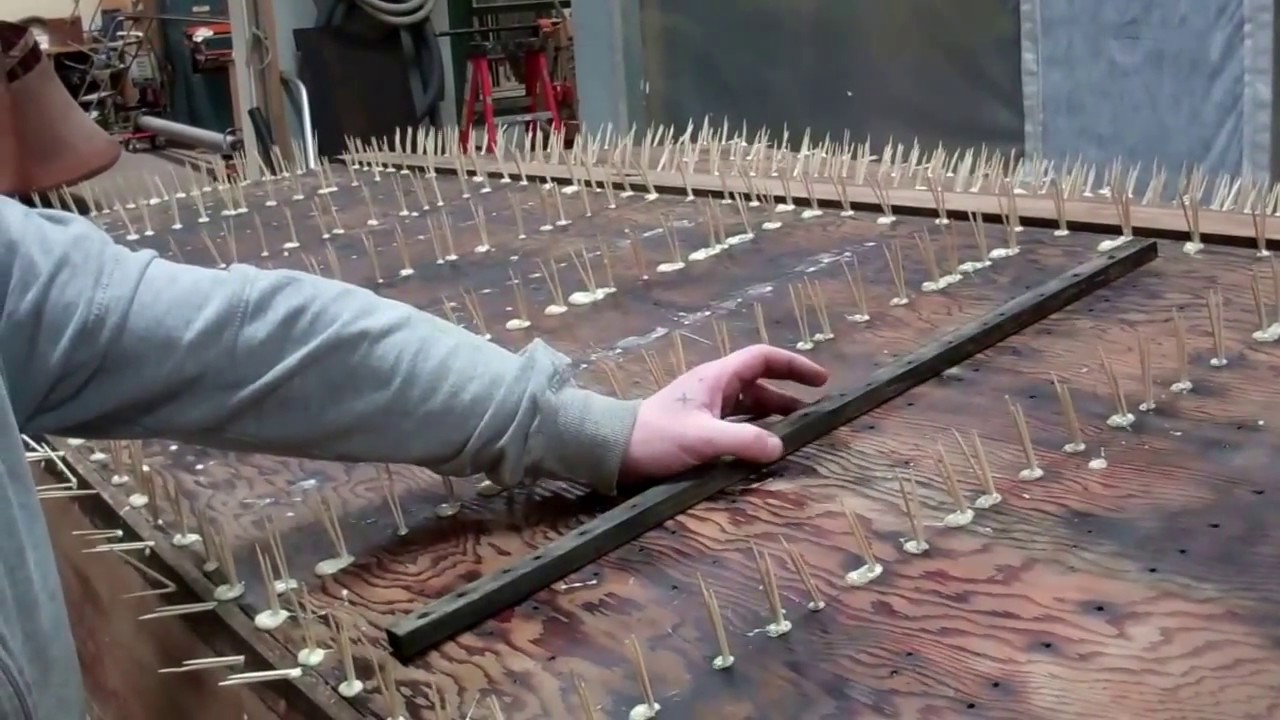
Once we dry-fitted each, approximately 5-3/4”-wide plank, everything was sealed with four coats of Smith’s CPES, after which we have applied three coats of Chris-Craft mahogany bilge paint to their inner surfaces. Next, we installed these planks bedded in mahogany 5200 using #6×1” Frearson-drive, flathead silicon bronze wood screws.

Happily, her bilge now presents exactly as it did when Priscilla left Algonac in 1940.

Planking the inner skin produces a tighter, more rigid skin that follows the bottom’s contours precisely. Any interior squeeze-out will be removed using nylon putty knives before it, too, receives three full coats of Chris-Craft mahogany bilge paint.

Post this experiment, SMB will make individually planking inner skins our standard for SMB True 5200 bottoms.

With the Meranti planking in-hand, and having milled it to land fair with the chines, and began dry fitting it to her bottom. Our first step involves measuring both bottom faces at their widest point between the keel and the chine.

Here, and as we’ve shared with you earlier, we once again confirmed that Chris-Craft’s rule-of-thumb was operating at Algonac when her hull was being laid out. She is 7/8” wider on port than she is on starboard at the widest point between her keel and chines. And, at the transom, she is a 1/2” wider on starboard than she is on port.

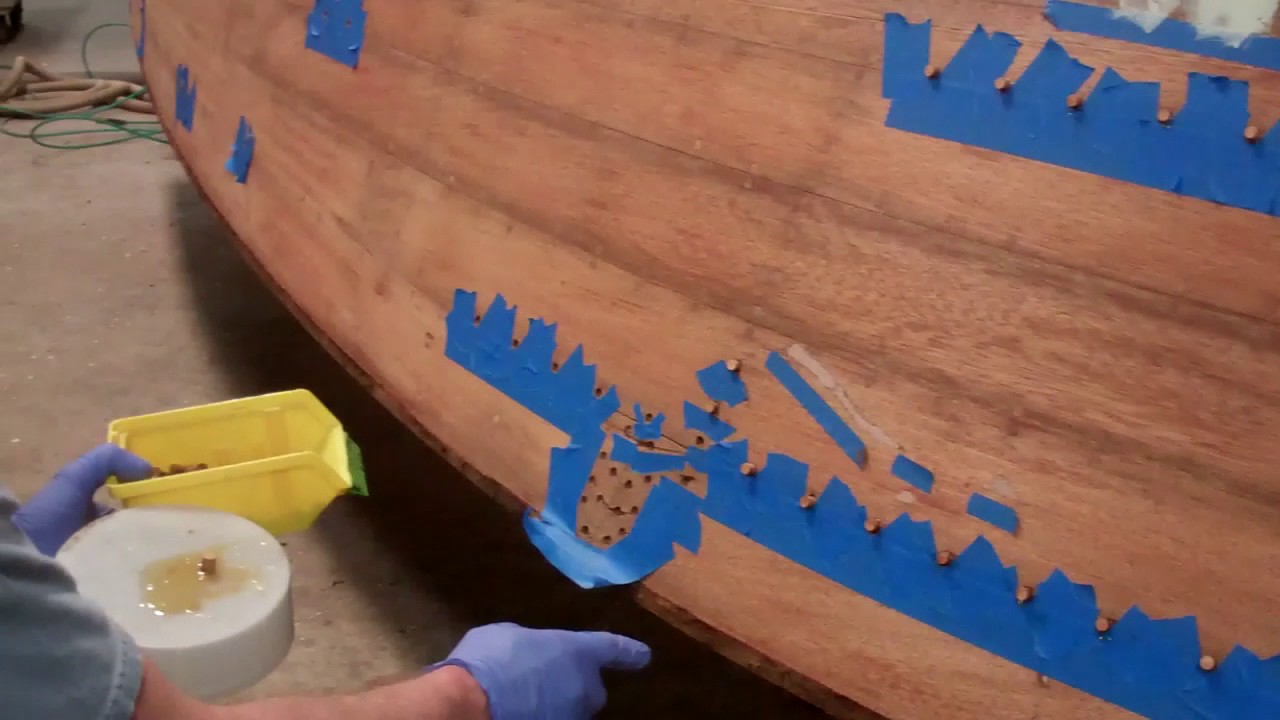
Joe will dry fit and fasten the outer planks temporarily, working from her keel to her chines. Once laid out completely, the planks will be released and sealed on all sides with four coats of Smith’s CPES. We will also apply one final “insurance” coat of CPES to her inner skin’s bottom.

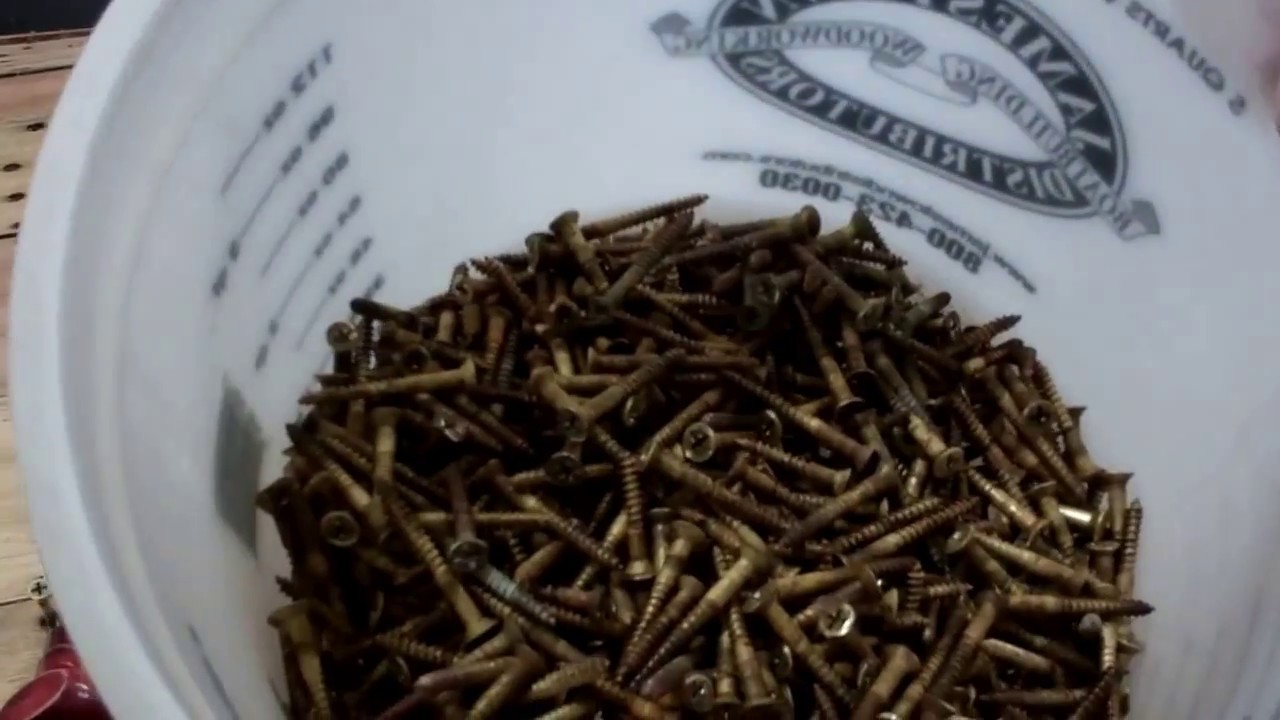
The final assembly step involves bedding each outer plank in an at least one-eight-inch-thick bed of white 3M5200, before fastening them with #8×1-1/4” flathead silicon bronze wood screws. Finally, and that’s when she really begins looking good, we apply five coats of Interlux InterProtect 2000E Barrier Coat Epoxy Primer, with alternating gray and white coats, which helps expose any holidays. Per Interlux’s instructions, 2000E should be applied in thin coats.

1947 Chris Craft U22 Snapped Bottom Plank Fasteners

1947 chris craft U22 snapped bottom plank fasteners

Anthony began cleaning our 1047 U22’s bottom planks and sorting them into two groups – use and replace – yesterday. We usually unearth a few broken fasteners when stripping bottom planks, but never in our history have we discovered that more than seventy-five of them have snapped at the point where the threads and shank meet, or just about fair to the bottom frames. About half of the chine plank screws are snapped as well.

We can only surmise that the fasteners failed as a result of crashing into the rocky bottom, especially since virtually every screw in the aft third of the bottom snapped.

Bottom line, that most of the fasteners snapped during the crash tells us that the canvass lining and paint were all that was holding bottom planking planks in place. Ouch!

That said, Anthony must drill and use needle-nose Vice Grips to back out what remains embedded in the frames. We will then toothpick every hole using hardwood (ash) toothpicks dipped in Gorilla glue. This video from 2019 illustrates the process and what our U22 will look like once she has been “porcupined.” Once the glue has cured, we reach for our Fein MultiMaster Oscillating Cutting Tool to give her bottom and chine framing a “quill-cut.”

Then all the stubble will be sanded fair before we begin flooding the frames with Smith’s Clear Penetrating Epoxy Sealer.

1946 Chris Craft Brightside Filling Countersinks with 3M Premium Marine Filler

1946 Chris Craft Brightside filling countersinks 3M premium marine filler

Time to fill a few – thousand – countersink holes!

We use 3M Premium Marine Filler and its associated crème hardener for this purpose.

A caution. Mix the filler in small quantities, maybe about half the size of a golf ball, and drizzle a small dollop of the hardener on it. (If you mixture is noticeably bluish, get spreading NOW because the pot life will be a scant few minutes – 3 – 4.)

John and RJ prefer a yellow body compound spatula to my flexible putty knife, but either can apply the material to the hole.

In theory you make a first pass laying material into the hole, followed by a second one back and 90 degrees from the first. In fact you will, or at least I do, soon discover that three or four swiped removes the excess from the surface surrounding the hole while also filling the hole flush with the surface.

We mask off the seams with narrow blue painter’s tape to ensure that the Premium Filler does not find its way onto the 3M 5200 lying therein. Yes, it will appear to adhere, but be forewarned, it will not and your subsequent “beautiful” bottom paint will end up have splotches everywhere that the 5200 shed the filler.

Allow the first coat to cure, apply a second, and then remove the tape, which reveals more rows of empty countersinks. Yes, the fun is near endless.

Once both sides are filled, fair with a longboard sander and 80 grit, seal all of it with at least two coats of CPES, and begin laying on what will be five coats of Interlux 2000E Two-Part Epoxy Primer (Barrier Coat), followed by the bottom paint of your choosing.

1959 Chris Craft Sportsman Replacing Loose Fasteners and Wood Bungs

1959 chris craft sportsman replacing loose fasteners wood bungs

Why Attention to Details is Critical

Details, details, details. Dismiss them at your peril, as we were reminded today as we considered next steps on the 1959 Chris-Craft Sportsman preservation project.

We decided together that, other than the two rub rails, which were loose and rotted in several places each, the balance of the topside planks appeared ready for longboard sanding, bleaching, staining and sealing. Then John said, “No. Look at these seams and the fact that that several of the topside planks were standing proud along their edges.”

A series of strikes using a rubber mallet confirmed John’s suspicion that the fasteners in these areas had backed out a bit, lost their bite into the underlying frames or battens, or simply broken.

Even more mystifying was the fact that the bungs lacked the telltale black rings that signal adhesion failure, but when he touched them with an awl, they simply released completely, falling on the floor.

Note to selves: Pay closer attention to bungs and how the planks are lying relative to one another.

As the clip details, and we have now addressed, the fasteners had failed or broken across entire sections wherever the planks stood proud or the bungs popped in response to a gentle probe on port, and we will repeat the testing and same process on starboard next week.

Additionally, as we reported some time ago, the port side requires old fairing compound “fixes” to be repaired properly with Dutchman patches.

RJ and I will be proceeding with the final sanding and one more coat of CPES this coming week. Priming with fife coats of Interlux 2000E Epoxy barrier coat primer comes next, followed by applying two coats of Pettit Hard Racing Bronze bottom paint.

Why only two coats of bottom paint? Applying more coats actually degrades adhesion. Apply two coats not, and then inspect the bottom after next fall’s haul-out, and apply a freshening coat then depending upon what your inspection tells you.

All that said, our message here, both to you and us, is, “Paying attention to the minutia returns huge dividends. Not doing so risks disaster.”

1960 Cruisers Seafarer Bottom Refastened & Countersinks Filled

1960 cruisers seafarer bottom-refastened countersinks filled

Bottom fastened! Well, almost. RJ and I still must team as we tighten the tiny hex nuts on every machine thread screw that secures the strakes to one another between the ribs.

But at least refastening the plywood skin and below-waterline strakes is behind us!

RJ and I have also filled the fasteners countersinks with three applications of 3M Premium Marine Filler, and begun sanding them fair.

We have also stripped and bleached the transom, and will be staining it with brown mahogany (042) Interlux Interstain Wood Filler Stain, and then sealing it with CPES.

Stripping the topsides and stem will follow, after which I already know from inspecting them that we will face another round of refastening strakes and filling and fairing the countersinks with 3M Premium Marine Filler.

1959 Chris Craft Sportsman Porcupined!

1959 chris craft sportsman porcupined

The how and why of filling fastener holes with glue and toothpicks

Porcupined is surely the ugliest we make each boat during preservation. RJ and I spent many an hour sinking three round, maple toothpicks, dipped in Gorilla Glue each fasteners hole. How many? We opened and inserted 10 boxes containing 1,500 toothpicks each, and two pints of Gorilla Glue while filling every fastener hole from stem to stern and waterline to keel.

Now we are assured that the thousands of silicon bronze screws we will use to fasten the planking will bite into new wood.

We allow the glue to cure for 24 hours and then shave all the offending toothpicks off the hull using our Fein Multimaster. Next comes three coats of Clear Penetrating Epoxy Sealer and the bottom will be ready for the next steps.

Ahead of that moment, however, we must deal with the holes through which fasteners are sunk and fasten the intermediate frames – the battens – in place. All 32 of them must be degreased, toothpicked, sealed with CPES and installed, bedded in 3M5200.

Even more tedious is dealing with the hundreds of holes left when we removed the ½ – ¾ inch pan head brass screws that Chris-Craft sank into the bottom planking from inside the bilge. RJ teased the tips of #10 screws into each of these holes, lest we generate a forest of 5200 stalactites hanging from the bilge.

The bottom planking, which is in superb condition and remains eminently usable, must be scrubbed and sealed with three coats of CPES, at which time we will complete installation and the modified True 5200 bottom milestone will begin disappearing in our wake.

1959 Chris Craft Sportsman – How To Release Bottom Plank Fasteners

release bottom plank fasteners 1959 chris craft sportsman

The goal here is removing fairing-compound-filled countersinks and releasing the over 1,000 fasteners driven through the bottom planking and chines without damaging the edges of the countersink hole.

We begin with a portable drill and drill bit. (We use a pilot bit because it can withstand lateral pressure without breaking.)

Why drill all these holes? The Rotabroach cutter includes a positioning, spring-loaded pin. Yes, it can position the cutter in the countersink center, but it quickly gets loaded up with residue and fails to pop out once a countersink is opened. Then it walks across the plank until you grab a vice grip, remove the cutter and clean it.

Drilling the pilot hole gives the pin someplace to go without being pressed into the cutter head.

Next clean the hole using a scratch awl, and then the Frearson head slots using a pick, and blow the hole clean with an air chuck. (A shop vacuum will work here if the crevice tool is used, but the blast of compressed air cleans much, much more thoroughly.

Grab the impact gun to which you have fitted a #2 Frearson (Reed & Prince) driver and carefully back the screw out. (The impact gun’s trigger must be feathered so that it turns as slowly as possible for the initial rotations. A portable screw gun can be used, but it is much slower.)

The mini hook comes into play for those fasteners that simply spin in the hole. Carefully work the hook under the screw head and apply a bit of upward pressure by levering against the edge of the countersink. (Yes, “unpleasant” utterances are part of this process.)

Once you have all the fasteners – which you absolutely will not reuse – safely in the recycling bucket, and have teased all the planks off the inner planking, you are ready for the next steps. In the case of the ’59 Chris-Craft Sportsman, since the plywood inner skin presents as almost new, the next step is scraping all the canvas off, cleaning the surface and proceeding to toothpicking every fastener hole in the entire bottom.

Once you have inserted 4 to 5 toothpicks dipped in Gorilla Glue, or about 5,000 in total, into all the fastener holes, and the glue has set, reach for your Fein Multimaster and “shave” the plywood. What a mess!

Time for CPES, 3M5200 and installing bottom planking!

Tools:

  • Rotabroach Cutter Kit – available at Amazon.com
  • Portable drill and pilot bitdrill bit
  • Portable drill for 3/8” Rotabroach cutter
  • Portable impact driver with #2 Frearson (aka Reed & Prince) driver
  • Scratch awl – a Stanley brand awl is available from Amazon.com
  • A mini hook and pick set like this

Why using stainless steel fasteners below the waterline is VERBOTEN

stainless steel hull fasteners

Don Danenberg’s seminal piece on 5200 bottoms, “What is a TRUE 5200 bottom,” Classic Boating, September/October 2014) is a must ready for anyone undertaking replacing an antique or classic wood boat’s bottom. The section on fasteners is particularly apt in this setting:

“Stainless steel was invented in 1913. The 300 series (302-316) includes 18-20% chromium and 8-12% nickel. (316 has 2-3% molybdenum, which makes it slightly less susceptible to crevice corrosion.) In the presence of oxygen, the chromium and nickel form a surface coating that protects 70% of the material is mild steel. If you bury them in the hull, covered with putty and paint, they are cut off from oxygen and will soon corrode like mild steel. Only silicon bronze is long lasting here. The only apparent reason some use stainless steel is that, coming from Taiwan, they are cheap!

“It doesn’t matter if they are advertised as ‘marine grade.” That only applies in the presence of oxygen. Please see this website (sic) link: http://www.stevedmarineconsulting.com

This clip illustrates exactly what Danenberg asserts. These fasteners have been in the chine planks for fewer than eight years, and have already failed completely.

Please insist on silicon bronze below – or near – the waterline. In fact, Snake Mountain Boatworks will not fasten anything but hardware with stainless. Yes, the silicon bronze, Frearson head fastener is much more expensive.

Here once again is a prima facie example of how eventual cost being seldom equals the initial price. Chines should not fail in fewer than eight years, and replacing them is far, far more expensive than the original cost differential between stainless and silicon bronze would have been had this owner insisted that only the latter be used to fasten her new chines.

How To Release Clinch Nails – 1942 Century Imperial Sportsman

how to release clinch nails 1942 century imperial sportsman

Clinching (sometimes spelled “clenching”) is when you drive a nail that passes through both thicknesses of wood you are fastening. The tip of this nail sticks out about 1/4” and is bent over and driven into the wood.

That is all and good, but how about the poor person trying to repair or preserve a wood boat like the 1942 Century Imperial Sportsman that has been clenched?

If you can get to the edge of a board so fastened, and there is room for the tool, the nails can simply be cut off using a tool like a Fein MultiMaster.. It is quick, clean and relatively easy to execute. It also leaves the tip of the nail imbedded into whatever framing the nail was clenched to. Woe be unto the unsuspecting person who reaches in there with a fine handsaw or worse, has released the frame member that is too thick for some reason and runs it through his/her planer! Those blades are anything but free!
Seeing me with the Fein tool in hand, RJ suggested pulling them with a simple hand tool, a staple or upholstery tack puller.

Voila’! Yes, a bit of patience and care is involved, but the tool can be gently inserted beneath the nail’s head, which is then carefully rocked upward to reveal its shaft.

In the clip I used right-angle needle nose pliers to finish carefully levering the nail free. Yes, it works, but it is also clumsy and can exert too much force all at once. (Or the operator can do so!)

Shifting to a six inch, very fine flat bar is the answer. Levering it slowly caused the nail to rotate as it was releasing, thereby leaving only a very small hole behind, one that is easily repaired with toothpicks and Gorilla Glue and faired.

I do not recommend this method on planking that is finished bright as it does tend to tear the edges of the holes left behind on the outer surface’s. Here I would go back to the Fein tool method so I could either clench anew or use silicon bronze wood screws during reassembly.

Do not try to pull the nails out by hand! I did so and yelped. That copper head’s edges are super sharp. Putting your heart into your work is one thing. Bleeding on it is quite another!

1946 Gar Wood Ensign Newly Planked & Ready for Bleach

1946 Gar Wood Ensign Planking Restoration

We could not be more pleased to have reached this milestone. We knew we had no choice but to plank the decks anew, but she was holding another secret beneath her tired, split and just plain worn out original decking.

Not only were both decks dripped and broken away from their respective connections to the gunwales, the balance of the framing had become distorted and disconnected over time. When we positioned several trial planks across the foredeck, a pronounced and ill-positioned hump was evident on port, while the starboard side was essentially flat. The aft deck had similar issues.

Our strategy for addressing bringing the decks back to their proper shapes and strength involved releasing and re-fastening the individual elements under pressure. Once everything seemed to be in place, we fastened the newly-fabricated planks, holding our breath all the while.

That we succeeded is evident in this clip. The foredeck has regained its correct “domed” shape. The bulkhead is firmly attached at both ends. And RJ can stand on the deck without deflecting it.

Addressing the aft deck required releasing and replacing much of the framing as the end of most of the members had suffered serious degradation over the years.

Bleaching is next, followed by staining. Only then can we begin rolling and tipping coats of varnish.