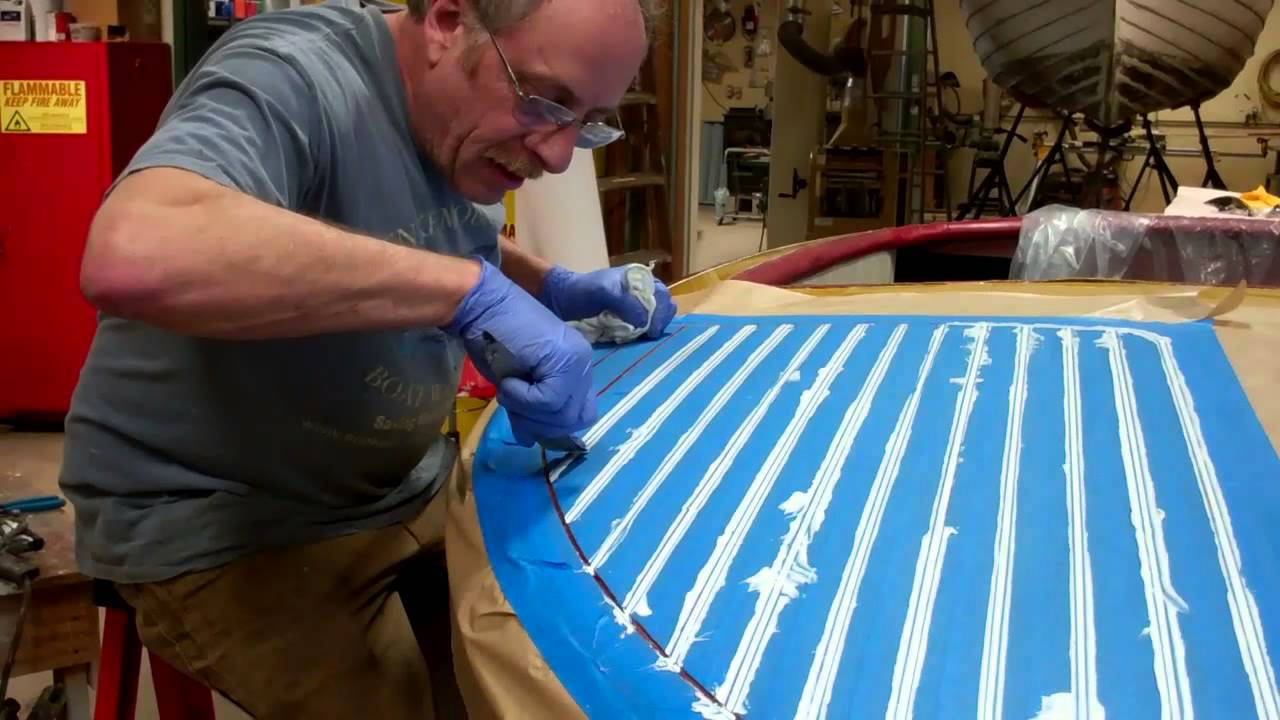
It is all about minimizing the amount of paint applied with each coat. We alternate between gray and white so we can ensure there is a ghost image of the previous coat showing through the one that is being applied.
Minimizing film thickness, in turn, is all about rolling each stroke out aggressively. Coverage is not your goal here. Build three super-thin coats to retain this primer’s wonderfully flexible properties.
We have tried most of the other topside primers on the market. TotalBoat is not only the best value, it is the best topside primer available today in our experience.
It dries quickly – to the touch in less than half an hour at most at 65 F. If your surface is still sticky 30 minutes or so post application, you are laying on way too much paint onto the surface.
Recoating in 4 hours means you can apply the first 2 coats on day 1, and the final coat the next morning. Four hours later, after a final quick sanding and wash-down with Acetone, and you are ready to begin applying the Interlux Premium Yacht Enamel.
Topside Priming Knock on Wood 1960s 20′ Lyman Part III 03 31 2015
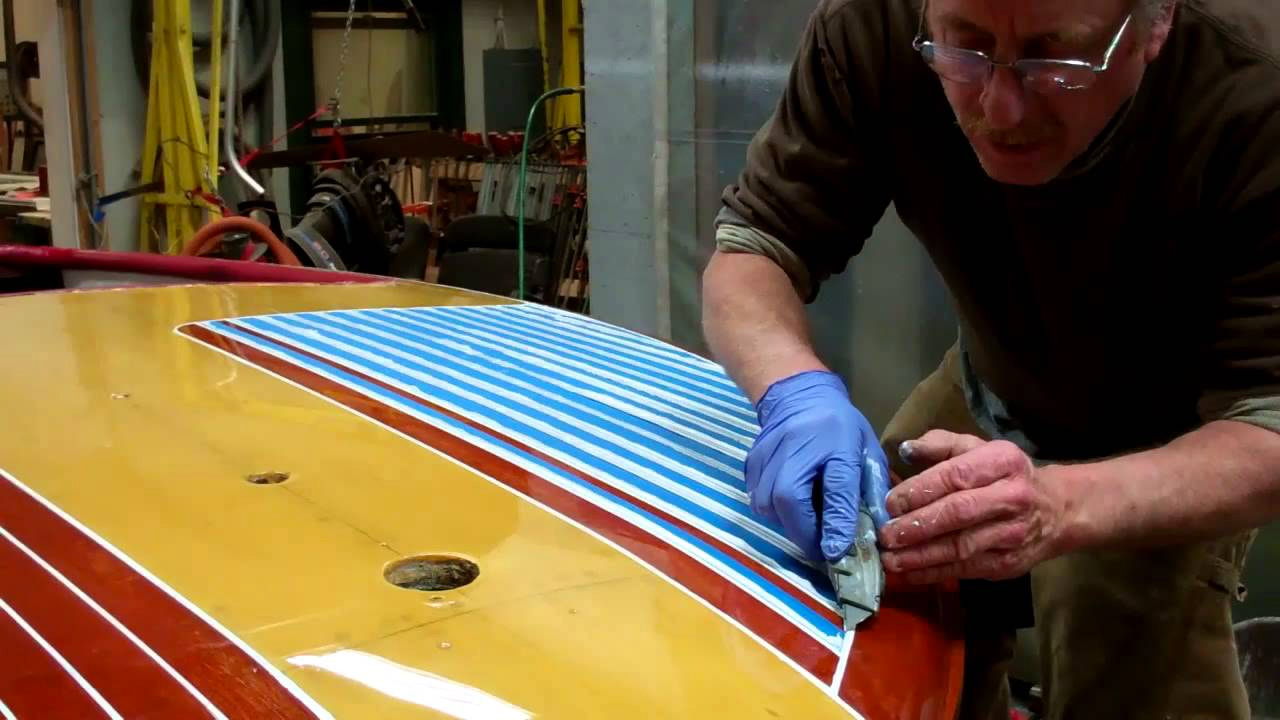
Knock on Wood has her sights on the finish line. Two more coats of Pettit Tie Coat Primer below the waterline, followed by 3 – 4 of Pettit 1933 Antifouling Copper Bronze bottom paint and she’s ready to float.
Three coats of Interlux Premium Yacht Enamel, which we will roll and tip, and she’s almost there.
We still have 3 – 4 more coats of varnish to roll and tip onto the transom. Her lettering will follow, as will rea-installing her drive train and hardware, and she will be good to go home.
Well, not quite as we have a surprise for her owners that will stay strictly in-house … for now.
Topside Priming Knock on Wood 1960s 20′ Lyman Part I 03 31 2015
Knock on Wood is a mid-1960s 20’ Lyman runabout who has reached the priming and painting lap of her preservation process.
We use Pettit Tie Coat Primer 6627 below the waterline and Total Boat Topside Primer above it. The TB primer is available in gray and white, which we alternate from one coat to the next as doing so helps us discern how much paint is actually being applied.
Applying super thin, what I term ghost-like coats of both primers is our, and should be your goal. Refer to the excellent product and “how-to” content Jamestown Distributors offers on its Web site, http://ift.tt/1xTXPT4.
While a yellow foam rollers is excellent at applying paint and varnish super evenly, it will only give you headaches on lapstrake hulls. The hard end of the roller can catch on and scratch the paint off the lower edge of the strake above the one you are painting.
Our roller of choice is the Pro-Line Mighty-Mini 4-inch foam roller, with foam extending completely around the outer end. (http://ift.tt/1NESYZq).
We will finish below the waterline with 3 – 4 coats of Pettit 1933 Antifouling Copper Bronze bottom paint, and Interrlux Premium Yacht Enamel, 220, semi-gloss white for the topsides.
Interlux 220 is a wonderful topside paint that dries to a lustrous sheen, rather than a high gloss. As such it is our go-to topside paint for Lyman runabouts and Chris-Craft Sea Skiffs.
Keeping a wet edge is the key to success in any painting project, a goal that is quite challenging with applying TotalBoat primer since it dries so quickly. The next clip shows you how we apply this paint successfully at Snake Mountain Boatworks.
46 Gar Wood Engisn Finished Bright 03 25 2015
Rolling and tipping the final coat of Pettit Hi-Build gloss varnish on this 1946 Gar Wood Ensign is now behind us. We will allow the curing process to run for several days before John launches another session of taping off and filling seams with Sikaflex 295 UV.
Yes, I am repeating myself, but this step is critical to achieving as dust-free a result as is possible. All of the lights in the paint room will remain on until the surface is dry to the touch. Why? Fluorescent lights create static electricity when on that attracts and holds dust particles in place. Turn off the lights and gravity works. Dust particles are released from the fixtures, settle on a boat’s horizontal surfaces, imbed themselves into the varnish if it is still wet or even slightly tacky, and ruin the surface.
We will apply one more coat of semi-gloss white (220) Interlux Premium Yacht Enamel to the topsides and touch up the copper bronze bottom paint, at which time she will be ready for reassembly.
1952 Chris Craft Riviera How We Fill Deck Seams
As one of my guys loves to say, “She’s coming into it now.” The 1952 Riviera runabout’s seams will be Sikaflexed by this evening, painted by Thursday and begin wearing her hardware next week.
We use white Sikaflex 295 UV, followed by high-gloss Total Boat Wet Edge topside paint.
As RJ is Mr. Varnish, John is the guru of filling seams. Not surprisingly, as is the case with most everything else in delivering finishes to die for, it is all about preparation. It took John most of an afternoon to tape the aft deck and covering boards, and all morning today to tape off the foredeck.
Why so long? Every edge must follow the seam’s shoulder precisely. Using a utility knife blade and incredible patience, John slices slivers of tape away so that all arcs are perfect and all straight lines are exactly straight.
He will be doing the ’46 Gar Wood Ensign once we apply the final coat of Pettit Hi-Build gloss varnish.
Sikaflex in Seams Follow up ’52 Chris Craft Riviera Runabout
In response to several requests to see how John does it, here is a follow-up clip on Sikaflexing the seams of our 1952 Chris-Craft Riviera Runabout showing how John removes “all that blue tape and Sikaflex residue without getting it all over the varnish and him.”
It truly is tedious, painstaking work, as he must tease a corner of the tape free and then pull it up and off and towards the seam he is freeing. Pulling it laterally away from the seam risks raising little tails of Sikaflex that can flop over onto the varnish.
We begin removing the tape the moment the last seam is filled lest the Sikaflex begins setting. (We always do the same thing when painting or varnishing. Letting either cure prior to releasing the masking tape risks producing a ragged line, or worse.)
As, save for the pint room which we keep between 65 and 70, the shop stays at about only 60 F in the winter, which slows cure times, so the Riviera will sit until next Monday when RJ will apply white paint to the seams using his pin striping wheel applicator.
Installing Her Lycoming Engine Back in the 1930 Dodge’s Engine Bay 03 23 2015
Her original, totally rebuilt Lycoming flathead four is back in the 1930 Dodge runabout’s engine bay. But it did not go easily.
The engine hatch is so small relative to the engine, that even spinning it 90 degrees failed to give us enough room until we removed the generator.
But now it is in sitting on the stringers, secured to its mounting bolts, at least provisionally.
The prop and engine couplings do not quite line up, and almost is just not good enough unless you want your power train to vibrate the hull to pieces. Hulls can change shape when they sit for decade after decade, which, in this case translates into a shaft log and strut that are no longer aligned perfectly. The prop will turn, but not without a bit of resistance at some points around the circle.
We will be fabricating and installing shims until the two couplers mate perfectly and the prop turns smoothly when the engine is in neutral.
1956 Century Cowhide Palomino Preservation Complete
Very few of Century Boat Company’s “Cowhide” Palominos with their distinctive Avodire decks and glossy black topsides and covering boards were built in 1956. Fewer still have survived. Hull No. P5652 is one that did, along with her original Tee Nee trailer and 30 HP Johnson Sea Horse outboard.
As we have observed during her preservation, she is the single most original Century we have seen to date at Snake Mountain Boatworks. Our work was purely a cosmetic preservation as nary a single piece of wood has been replaced. We saved, polished and re-used every hardware fastener. All of the hardware is original, having been prepped and plated by New England Chrome Plating, East Hartford, CT.
Fran Secor, noted Johnson rebuilder and restorer, has been able to save her original engine. As of today he’s completed all of the mechanical work and much of the final painting and assembly. Would a larger engine propel her more quickly? Yes, but it would not be original.
Save for her seat cushions, all of the upholstery is original, and those cushions were fabricated by A&A Marine using material from a NOS bolt of period cowhide fabric, sourced from the firm that supplied Century during the mid-1950s.
While we have, and her new owner(s) will receive her original burgee and stern flags, neither of them could survive even one roar across the water. We found an identical stern flag from the same period, and had Dave at A&A Marine fabricate two burgees, the black-on-white one that you see in this clip, and the more traditional white-on-red background burgee resting on the helm cushions.
Her Tee Nee trailer is about half-way through a complete restoration that began with it being completely disassembled, sandblasted and primed with metal etching primer, and is now being in brilliant Ford chrome yellow two-part epoxy.
We are racing to have her ready for her new owners before the ice leaves Lake Champlain. Meeting that goal is made easier by the fact that we still have over 2 feet of ice on the Lake.
1930 Dodge Runabout & Lycoming Engine Progress Update 03 10 2015
The Minnow’s original 1930 Lycoming flathead four engine is back in the shop following a comprehensive rebuild by Robert Henkel and his team at Chris-Craft Parts in Michigan (http://ift.tt/1w7jSRy).
As parts are beyond difficult to find for this engine, Robert faced and overcame the challenge by having specialists in his network fabricate such parts as valves, pistons and more.
By week’s end we will have dropped the engine into the Minnow’s bilge, have reconnected her prop shaft and prop, installed her rudder and begun the final detail painting of her engine compartment, seat frames and bilge.
Soon, and we hope by the end of March, she will be ready to sojourn west to her owners in Oregon, where he will enjoy completing the cosmetic work, having seating upholstered and cockpit padding installed. (Happily on this score, I found some original upholstery beneath the most hideous
vinyl you have ever seen today. Matching her original upholstery is made ever so much easier by this discovery.
She will leave us sporting a true 5200 bottom that is planked identically to what the Dodge factory installed in 1930. Trailer sailing her will now be possible where it was not before her preservation was entrusted to Snake Mountain Boatworks LLC.
’46 Gar Wood Ensign Sealed & Ready for Varnish 03 06 2015
Now that three coats of Interlux Interprime Wood Sealer has been rolled and tipped onto her decks and coming and covering boards, varnishing this 1946 Garwood Ensign will begin next week.
We followed our long-held practice, quickly scuff hand sanding after each coat of sealer using 220 grit paper. Doing so knocks down any dust particles trapped in the surface.
We will sand the final coat on Monday and wash the surface down with acetone, before RJ and John begin rolling and tipping Pettit High-Build varnish onto these surfaces and include you in the process via follow-on clips.