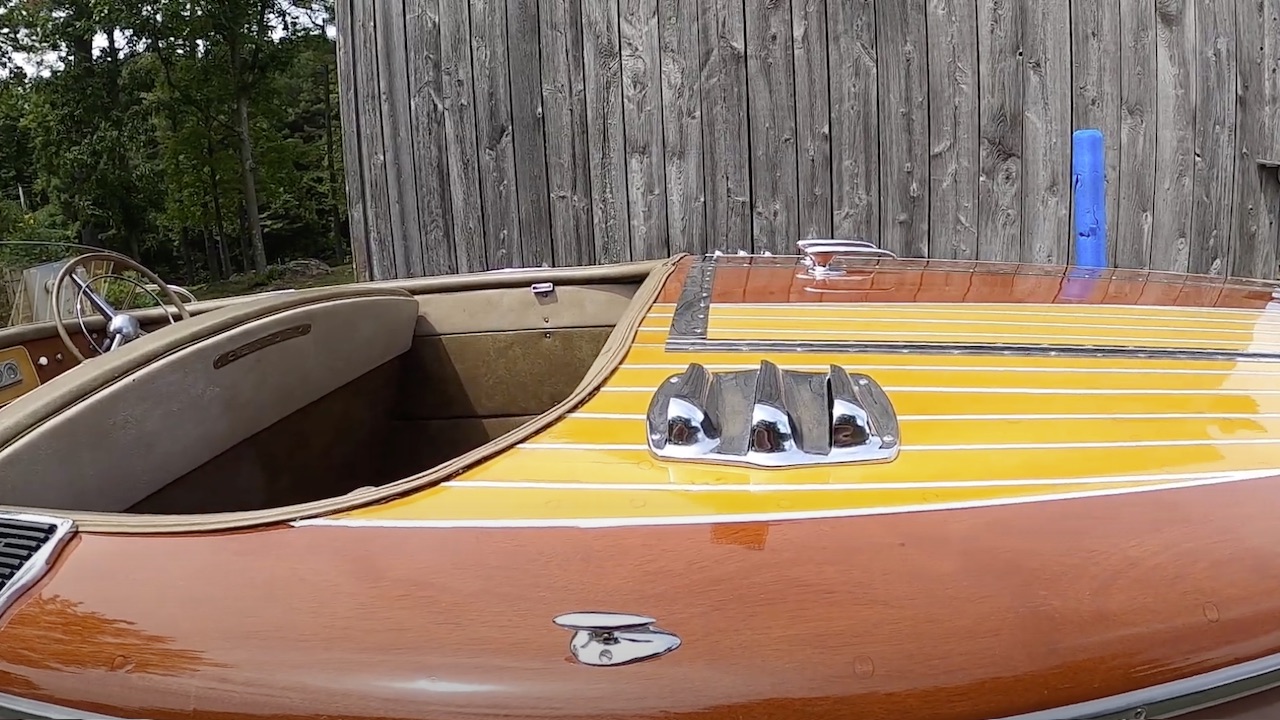
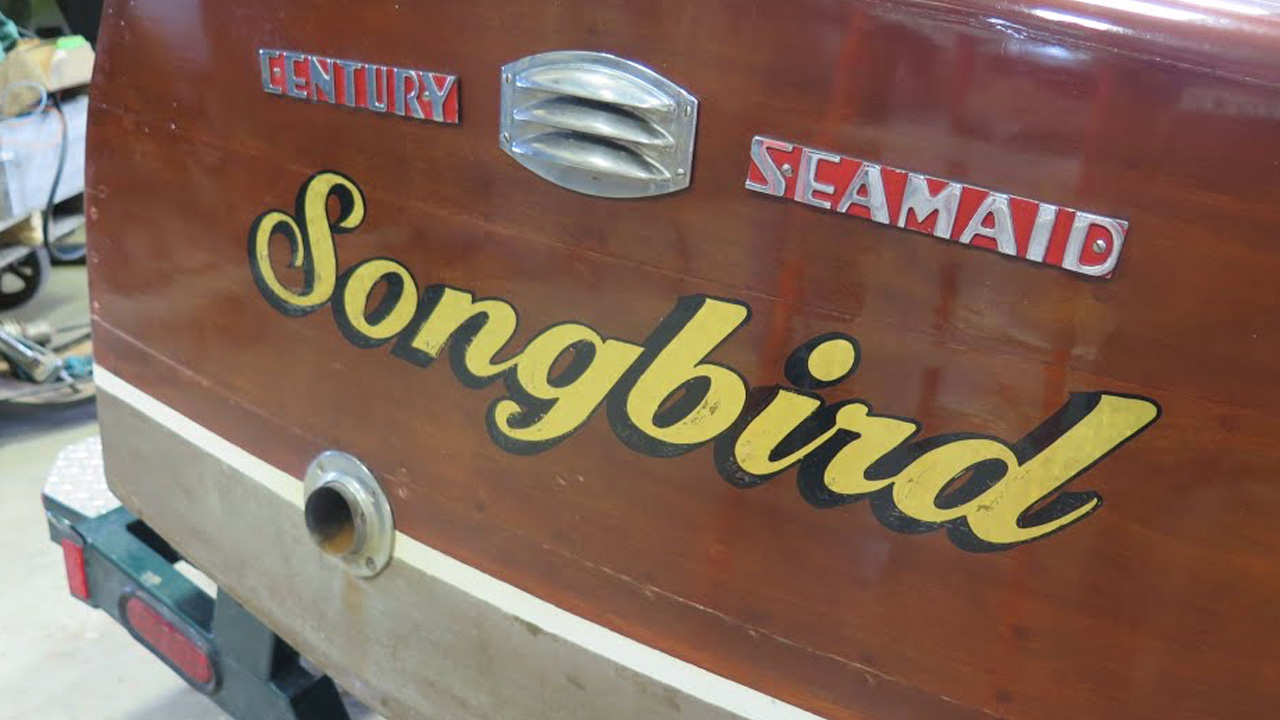
Songbird is a 1948 18-foot Century Sea Made who arrived in October 21. Now, some ten months later, and following a total, bow-to-stern, gunwale-to-keel preservation. This clip’s thumbnail photo offers a hint of the challenges she was hiding beneath her “skirts.” Over three inches of hated automobile Bondo graced her bow and foredeck. More of this stuff elsewhere, combined with disastrous “restoration” work elsewhere translated in a virtual wholesale replacement of her bottom framing, rerouting her deck seams, refastening most of her planking and on and on.
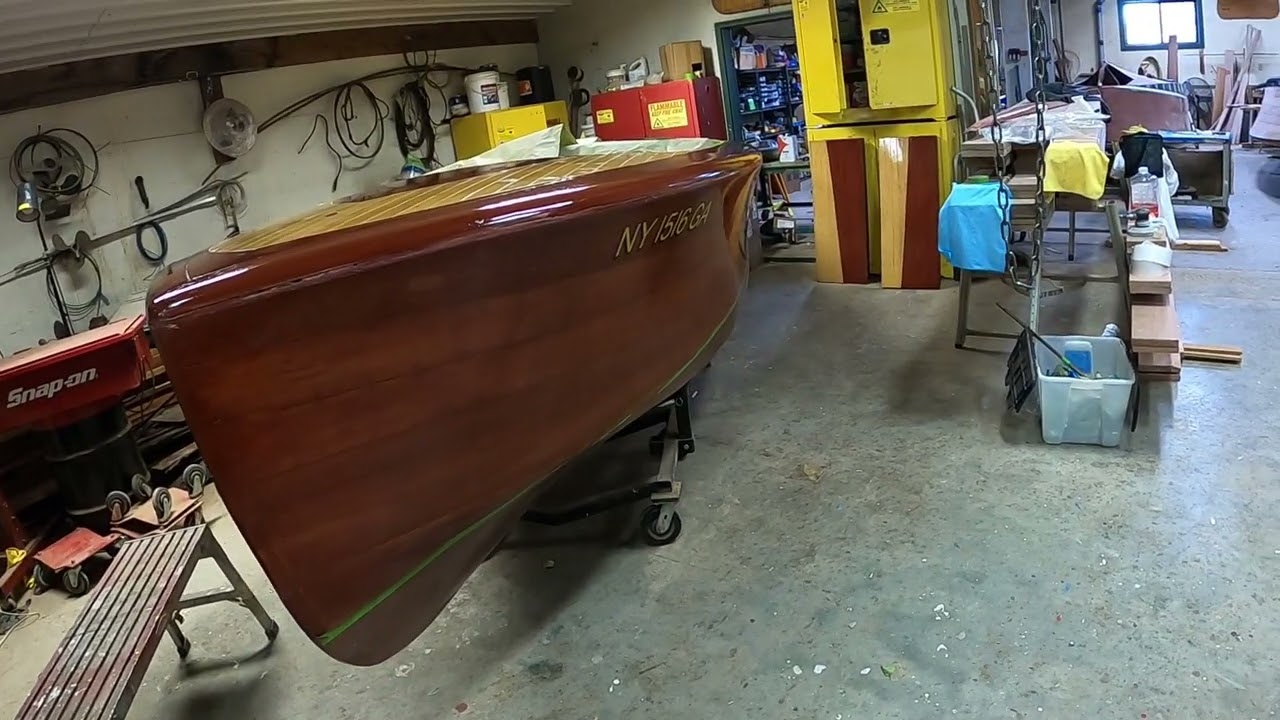
We persevered, and today we are celebrating as Songbird burst out of the shop riding her custom-built trailer, ready and oh so anxious to be homebound.
Her True 5200 bottom will keep everything dry, and her now show-ready finishes will turn heads among wooden boaters everywhere.
Just to provide a sense of her journey, here is a chronology of her preservation:
Songbird is progressing, despite curing still being severely hampered throughout the shop by chronic humidity levels of 80%-90%+ daily until yesterday. That we are “fully enjoying” monsoon rains and even higher humidity today is not helping.
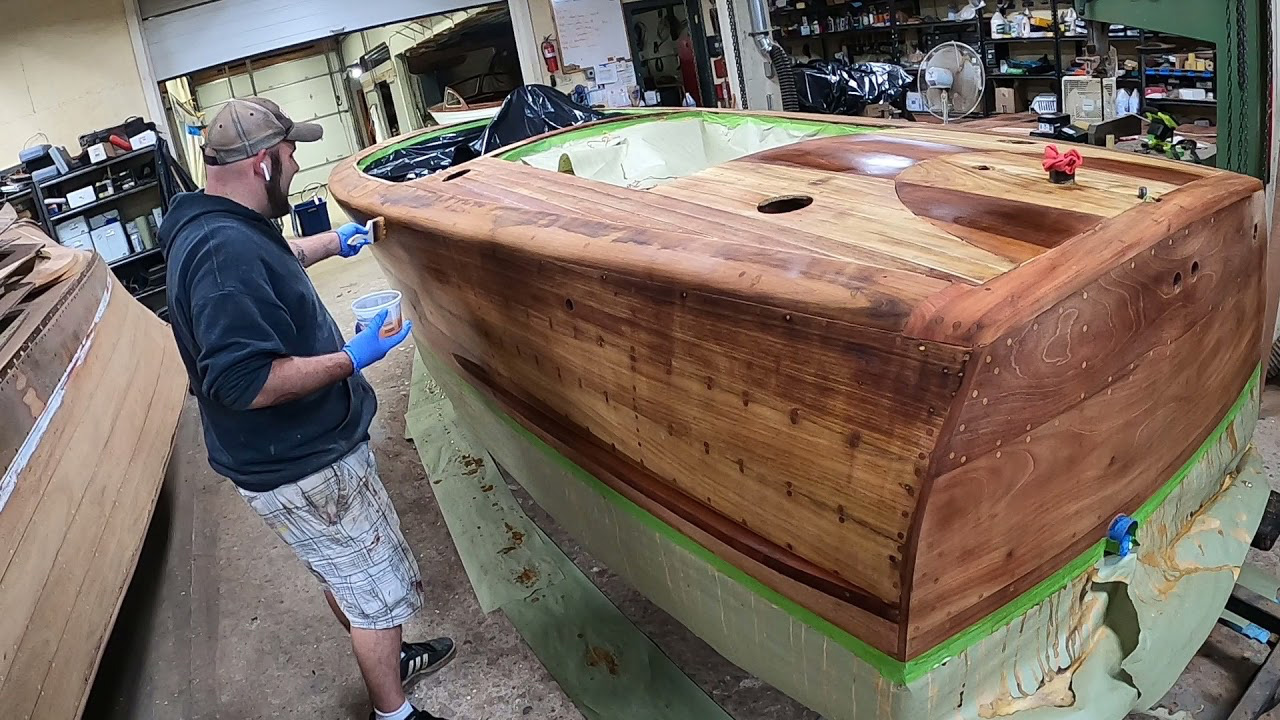
However, Joe took advantage of yesterday’s low humidity, which allowed varnish applied last Sunday to finally cure fully, to pay mahogany Sikaflex 291 LOT into Songbird’s deck seams.
Now we are waiting again.
If the rest of this week’s low humidity levels holds, we should be able to apply another coat of Pettit Flagship Varnish on Friday, and finally the last of the amber varnish next Monday.
Painting the seams with high-gloss white Interlux Premium Yacht Enamel will follow. As soon as it cures, we will be able to do a final block sanding of the entire hull using 600 grit before applying the final two-three coats of Pettit Captains Ultra Clear Varnish.
Finally, it will be final buffing/waxing and reassembly time, after which Songbird will be homeward bound. We cannot wait, which pales by comparison to how anxious her owner-stewards are to have her on the water again!
Finally! Songbird is spreading her wings as we apply Pettit Z Spar Flagship High Build varnish… three coats to date. Rick will be rolling and tipping coat number four later this afternoon.
No, the varnished surface on the decks is not flat …. Yet. Once we have applied her initial five build coats, we will sand the entire hull using 320 grit on one of our Hutchins manual longboards now, and progress towards 600 grit later in the process.
You may notice that we have corrected the seam lines on her decks, and that where Century wanted her blonde or dark and bereft of seam lines, she now is.
We will continue varnishing and be back to you about ten more down the road.
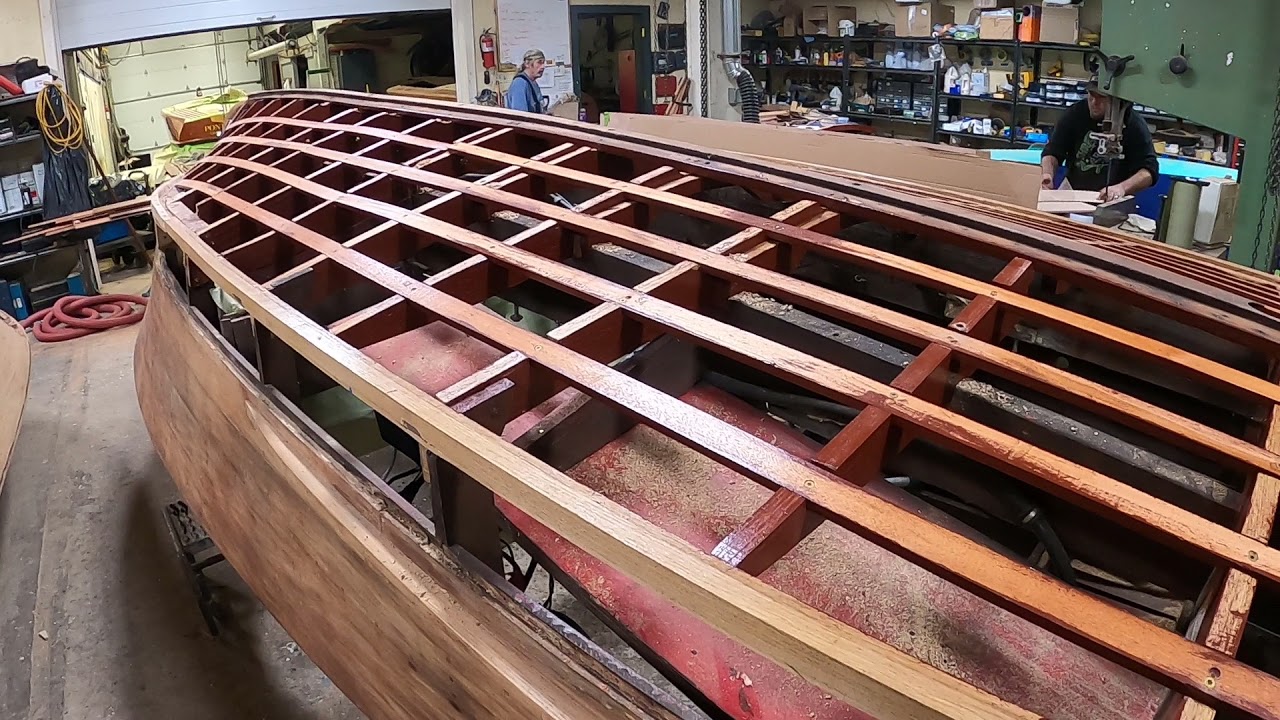
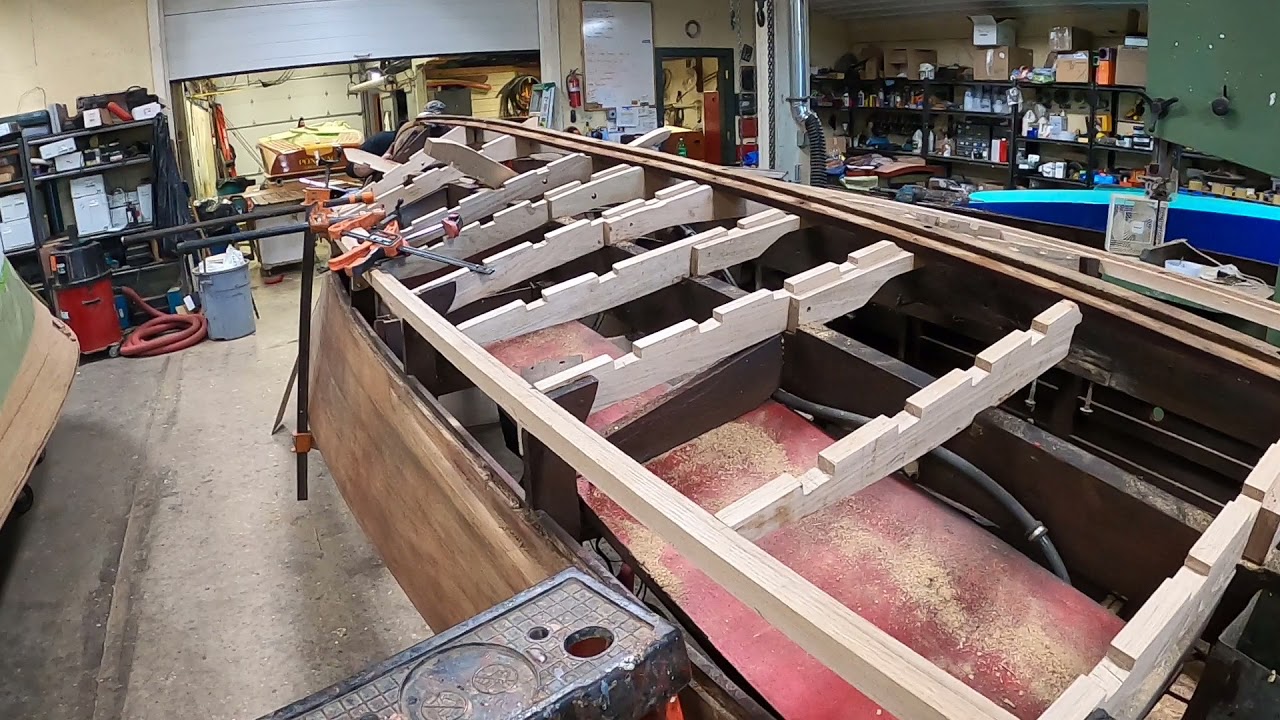
It is time to apply the inner skin and outer planks on our 1948 18-Ft Century Seamaid Songbird’s new True 5200 bottom.
Since the last update, every:
Frame was disassembled, heavily sealed with four coats of Smith’s, followed by three coats of OEM Century bilge paint.
Using 4mm Aquatek Meranti Marine plywood, all of the inner skin panels have been fabricated, fit, sealed with CPES and received three coats of OEM Century bilge paint.
The battens and bottom planks were milled to proper thickness, fabricated, fit and similarly painted, and the battens have been installed. Only final shimming of two batten landings remains, a task Joe and Rick are executing as I type.
All joints were bedded in 3M 5200.
All joints were secured with either 3/8” x 3” silicon bronze carriage bolts or #10 silicon bronze wood screws in varying lengths.
The ply will be in place by today’s close. The planks will be in place, sealed again with multiple coats of CPES and have received five coats of Interlux 2000E Two-Part Barrier Coat Primer by Christmas.
Merry Christmas, Happy Holidays and Happy New Year to one and all!
Our 1948 18-foot Century Seamaid is well on her way to having a virtually all-new bottom from the waterline down.
All be three new frames, the stem and the gripe, as well as the chine frames and bottom bow have been fabricated and rough-installed. (We use FAS grade white oak for the structural members.)
Once Joe finishes final fabrication of the stem, we will remove, seal and bilge paint all structural members.
Once sealed and painted, we will install her new bottom frame bedded in 5200 and secured with silicon bronze wood screws and carriage bolts. We will use longitudinal strings to ensure an absolutely true and fair frame.
We are replacing the Seamaids’ single plank-on-batten bottom with a True 5200, which is double plank. To ensure the new bottom’s final thickness matches the single-plank bottom, we use 4mm Aquatek Marine Plywood for the inner skin, followed by FAS grade Meranti planking planed so that it lands fair with the keel and just shy of share with the chine planks.
The inner skin is bedded to the battens and frames using mahogany 5200 and silicon bronze fasteners. The outer skin will be bedded in a 1/8-inch-thick layer of white 5200, save for mahogany 5200 forward where the bottom planks sweep above the waterline.
We will be updating you again sometime next week, when we should have the frame members and inner skin installed.
Songbird is on her way back. Rick has roughed in what will become a solid white oak bottom bow.
Degreasing the keel is ongoing, and the process confirms that its oil/grease is on the surface only.
Joe has begun replacing all of the frames from the firewall to the transom on both port and starboard. Preserving these vessels requires endless skill, but also the ingenuity that Joe exhibited in reaching for and tapping frame members using a small ballpeen hammer. If/when a series of taps returned a spurt of oil to the surface, the frame in question has failed beyond reason and will be replaced.
The starboard chine frame must have “enjoyed” several destructive visits by our resident genius. Using twenty-four inches of quarter-inch Luan plywood and sheetrock screws does not a sister make. (This is even worse when those screws are being “driven” into wood that is rotted to powder through and through!)
Each of the boat outfits had their issues – think of Chris-Craft’s use of a “rule of thumb” instead of a ruler to lay-up its hulls, with the resulting horror that the two covering boards on the same boat can differ by an inch or more in length. However. Century’s strategy of using quarter-inch-thick strips of mahogany for laminating a bottom bow strip-by-strip with the strips being installed and glued-up piece by piece is perhaps the worst methodology we have encountered to date.
Each of the boat outfits had their issues – think of Chris-Craft’s use of a “rule of thumb” instead of a ruler to lay-up its hulls, with the resulting horror that the two covering boards on the same boat can differ by an inch or more in length.
Songbird will have come a long way towards being strong and true by week’s end.
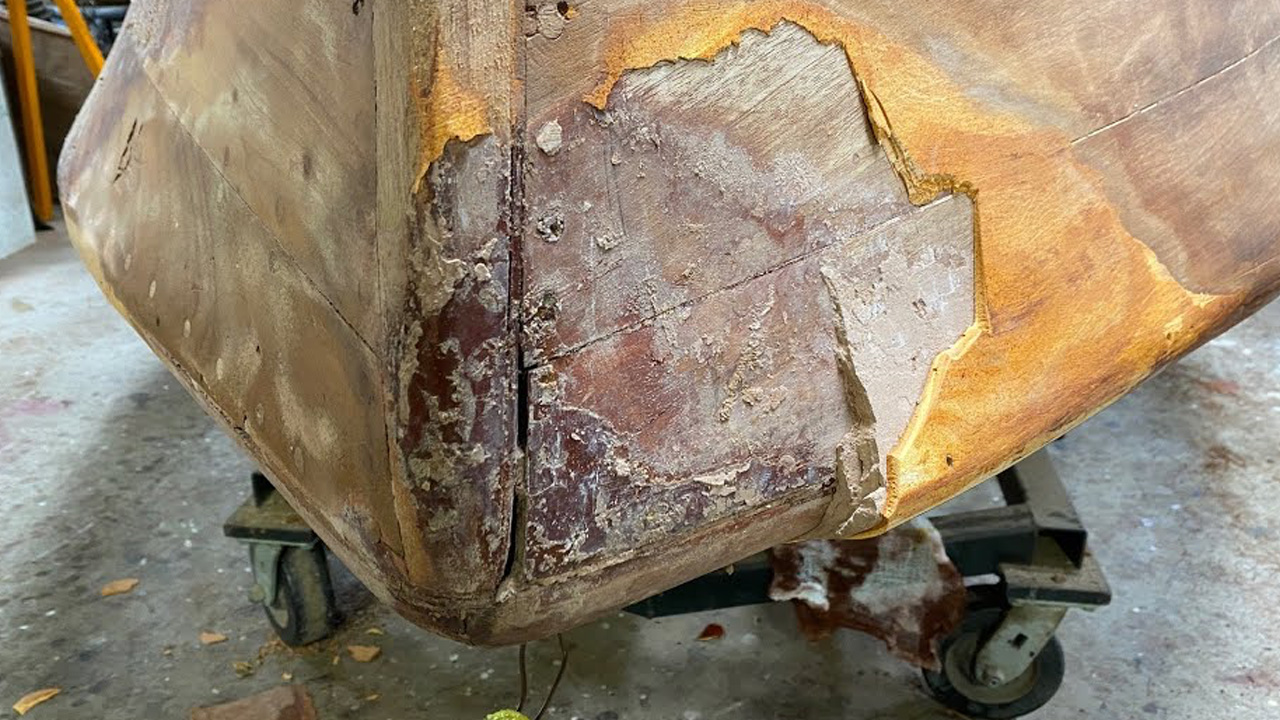
The mystery gets curiouser and curiouser! Why in God’s name would anyone choose to slather up to an inch-and-a-half thick layer of Bondo over what presents as perfectly sound planking and equally sound stem?
I sanded and sanded yesterday, and the progress I made working in from the perimeter is apparent in yesterday’s clip.
However, if you review it, look for the part where I discover that it the Bondo appears to be floating above, not adhering to the wood beneath it.
Early this morning, Rick went back at it using 80 grit and an inline sander. He was making good progress, but then he noticed an open crack in the Bondo’s surface, so he reached for a wood chisel.
Inserting it in the crack and then prying produced the chunk you see in my hand early in this clip, as well as a growing pile on the ground as chunks (platelets?) of Bondo fell away as he continued inserting and driving the chisel into the interface between wood and Bondo.
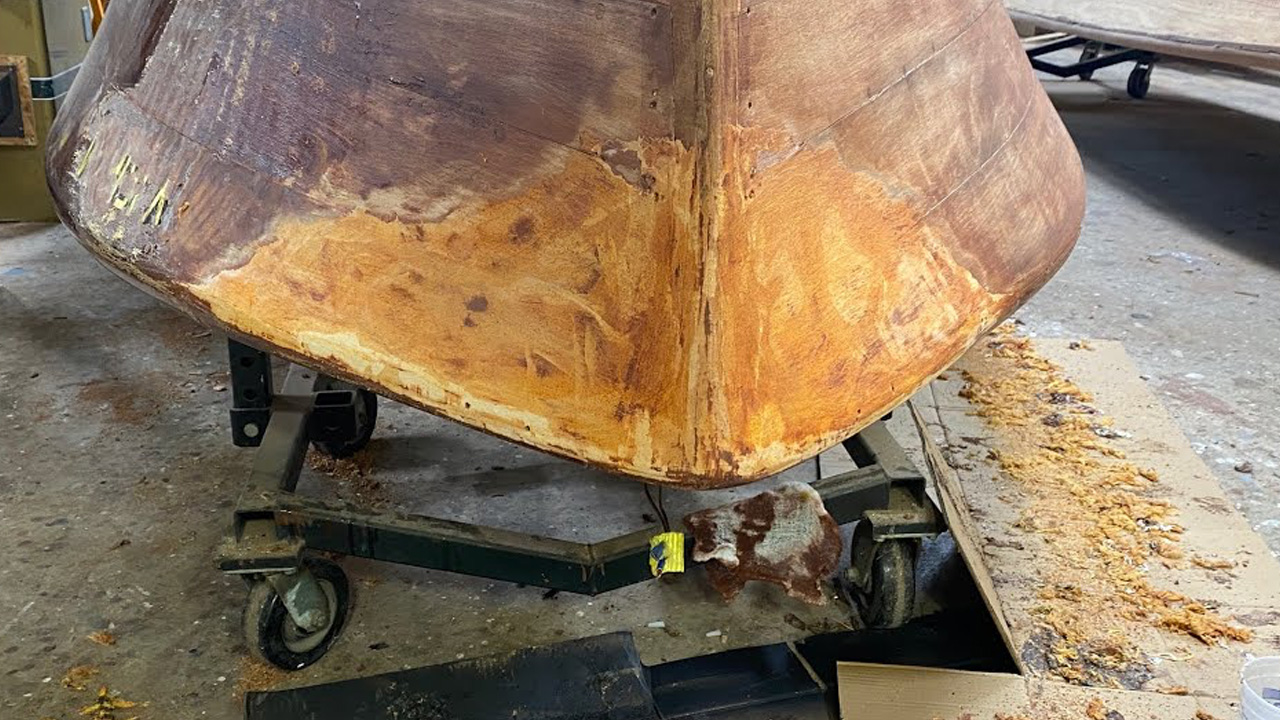
And now? Songbird’s bow is bereft of Bondo. Yes, there is an old gouge on port aft of the bow, but at 1.5” x 2.2” at its largest area, and barely 3/16” deep at its deepest, we can repair the gouge with a Dutchman.
Back to stripping hideous stain varnish off the topsides ….
We’ve continued focusing on Songbird’s bottom planking, all of which is no released and none of which can be reused, examining and evaluating her framing, and beginning the task of stripping truly terrible stain varnish and even more odious auto Bondo of her topsides. Rather than try to summarize 17 minutes of video, I will allow it and my narration convey the content.
After receiving ten coats of Pettit Flagship Varnish and then being sanded absolutely flat using 500 grit, Winnie will go to Joanie Alden’s lettering shop, Vital Signs and Silk Painting, in Colchester, VT for her transom and registration lettering.
All is good with Winnie, so much so that she might even be home for Thanksgiving.
Would that we can be equally excited for Songbird, who we flipped yesterday and began releasing bottom planks today.
Before us is a truly sad, sad antique runabout, one that is incredibly rare and truly iconic. I apologize for my rude language, but, as the clip chronicles, she has been raped in every way a wooden hull can be assaulted.
Folks! Automotive products have their place and can produce magical results …. On cars and trucks, NOT, NOT, NOT on boats of any sort, wooden, fiberglass, steel, aluminum or even Titanium.
And the worst of the worst other than cheap, Chinese engine parts – automotive fuel pumps, solenoids, oil filters and on and on – is BONDO!
Sure, some hack going the cheap route might get away with a little “repairing rot” using automotive Bondo for a little while.
However, automotive Bondo absorbs and retains moisture. Use it in place of a marine filler or fairing compound like 3M Marine Premium Filler, and all you are “achieving” is sounding the death knell of your wooden boat.
OK, what do I know? I’m not sure, but I have eyes. You have eyes. Pay attention to the destruction that using cantaloupe-sized gobs of Bondo has visited on this poor hull.
The Bondo plus gallons and gallons of leaking oil has created a perfect storm for destroying virtually every piece of structural wood from the waterline down to and including the keel.
The Bondo’s most aggressive destruction has occurred in the stem, gripe and keel where some complete buffoon thought she/he could glob in huge gobs of Bondo in place of wood.
Pay attention! In an earlier clip, I wondered at the line of about 7/16”-diameter circles along the stem that secured the screws driven through the cutwater. Hello?
After shooting the video, where we again wondered about these plugs again, Joe and I went at one of them with an awl. You got it …. Bondo! In fact, vast areas of the stem and what is left of the forward ends of the topside planks – particularly on starboard – are nothing but Bondo that is surrounded by rotting wood.
Can we save her? Yes. Just think of what we call our skeleton project, the 1950 18’ RIV that arrived in pieces, but now is sporting an almost-finished True 5200 bottom.
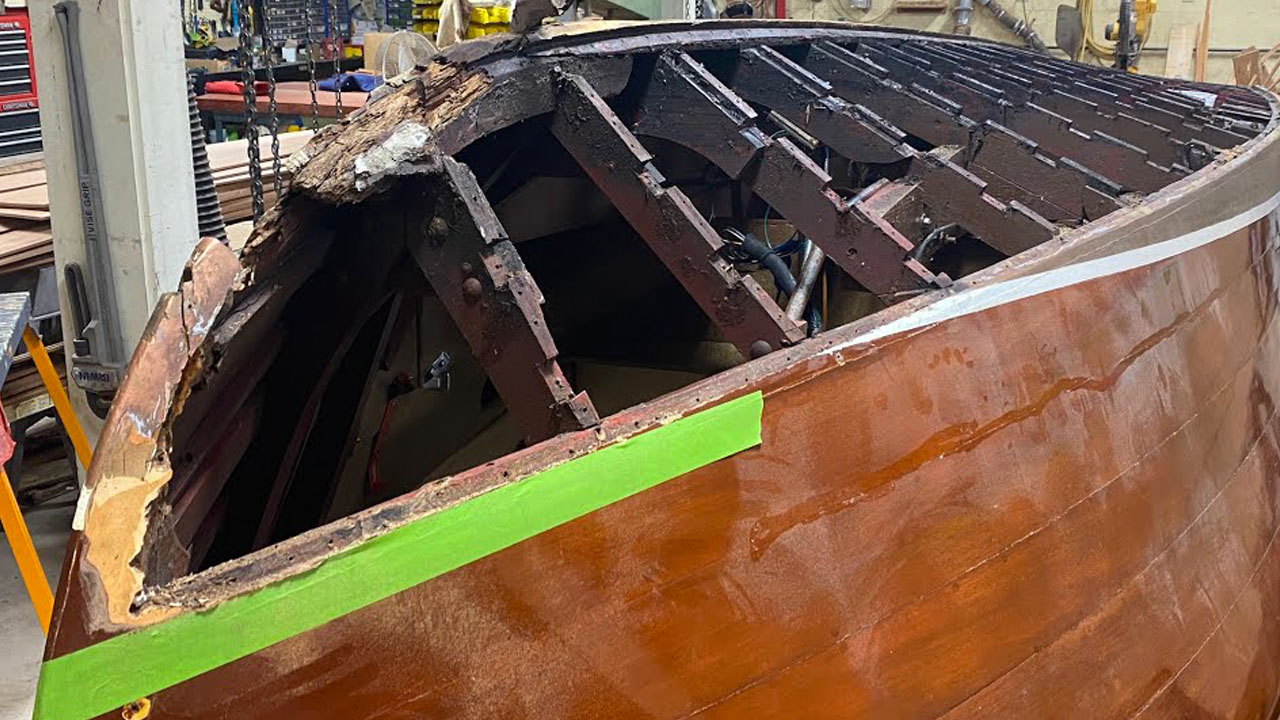
Yes, we can save her, but, other than the bilge stringers, virtually all the framing and planking below the waterline must be replaced. It looks to us now that the stem, gripe and keel must be replaced along with the transom framing at and below the waterline.
However, working on the stem requires that all of the topside planks’ forward extremities, at least back to the third or fourth hullside frame must be released. Releasing them means stripping varnish to bare wood.
But we also face the reality that most of the hullside frames’ lower extremities are rotted and floating, which is in part the result of some fool “sistering” the knees with random chunks of hard and soft wood, all of which is now oil-sodden and no longer attached to anything.
My final lament. Folks!!!!!! DO NOT EVER, EVER, EVER, EVER use anything but silicon bronze, Forstner, flathead screws in a wooden hull! This bottom was “fastened” with a random mixture of sheet rock, stainless, common steel, and, yes, a few original brass screws here and there.Thank God Don Danenberg just published what I consider to be the seminal article on repairing below-waterline framing in the November/December issue of Classic Boating, which I have scanned and printed, and insisted that I, Joe and Rick digest completely. Several copies are in the shop, and I’ll like be reaching out to Don as we try to save Songbird.
Winnie has been stripped and sanded fair, following Joe’s execution of a few Dutchman repairs and replacing a few loose bungs.
The hull is in excellent condition with nary any loose or broken screws.
Winnie is now enduring some aggressive bleaching using Daley’s A&B Bleach mixed at a ratio of 3B:1A. Joe began applying bleach early this morning and will continue reapplying it throughout the day, with a goal of keeping the wood soaking wet. After sitting overnight, her blonde inner self hull will begin emerging. She will be near snow white by the time her moisture content reaches about twelve percent.
Since now rinsing is required after applying Daly’s, we will next lightly scuff sand the hull using medium Scotch Brite pads. (Do not reach for sandpaper as sanding risks going through what is a very thin layer of bleached wood.)
Once she is scuffed and vacuumed, we will begin what will be a challenging staining process using Lake Oswego Boat Co. J’eld stain.
We will stain and seal (CPES) the blonde sections of the “torpedo” first to protect them from the dark stain we will use on the balance of the decks. The topsides and transom will be stained to match the decks.