1940 16′ Lyman Yacht Tender Preservation – Nearing The Finish Line

1940 lyman yacht tender preservation

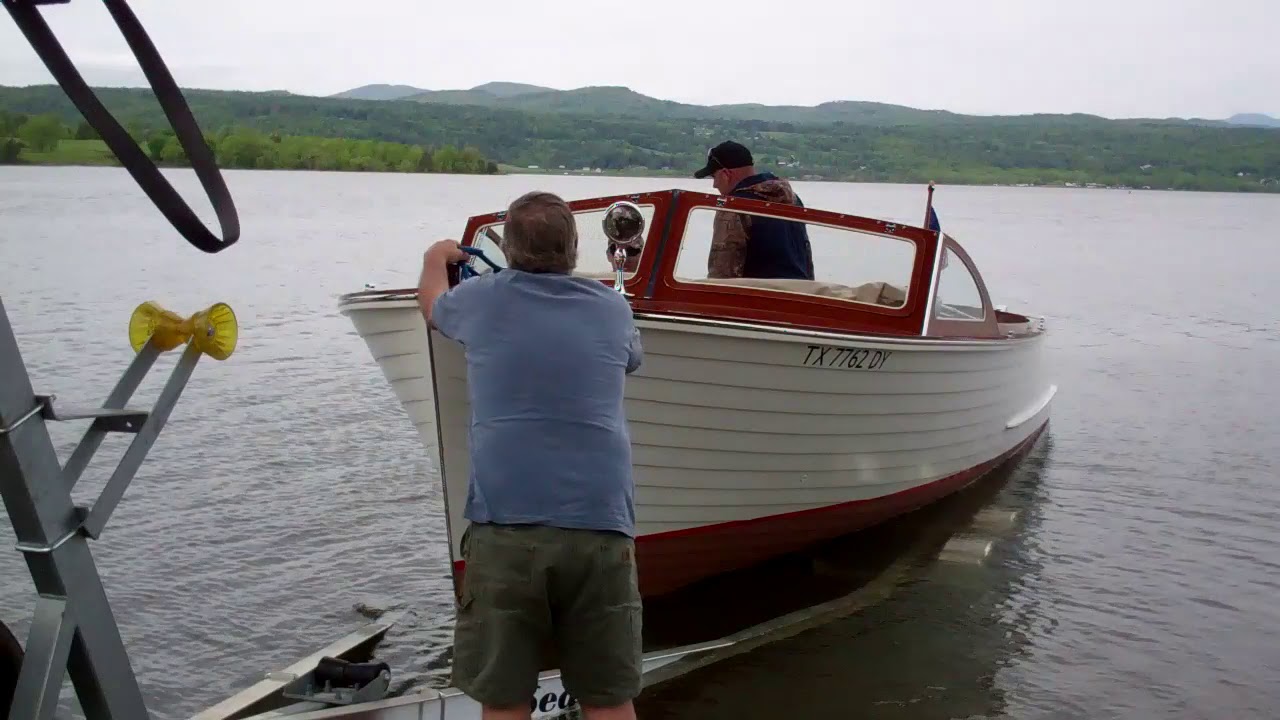
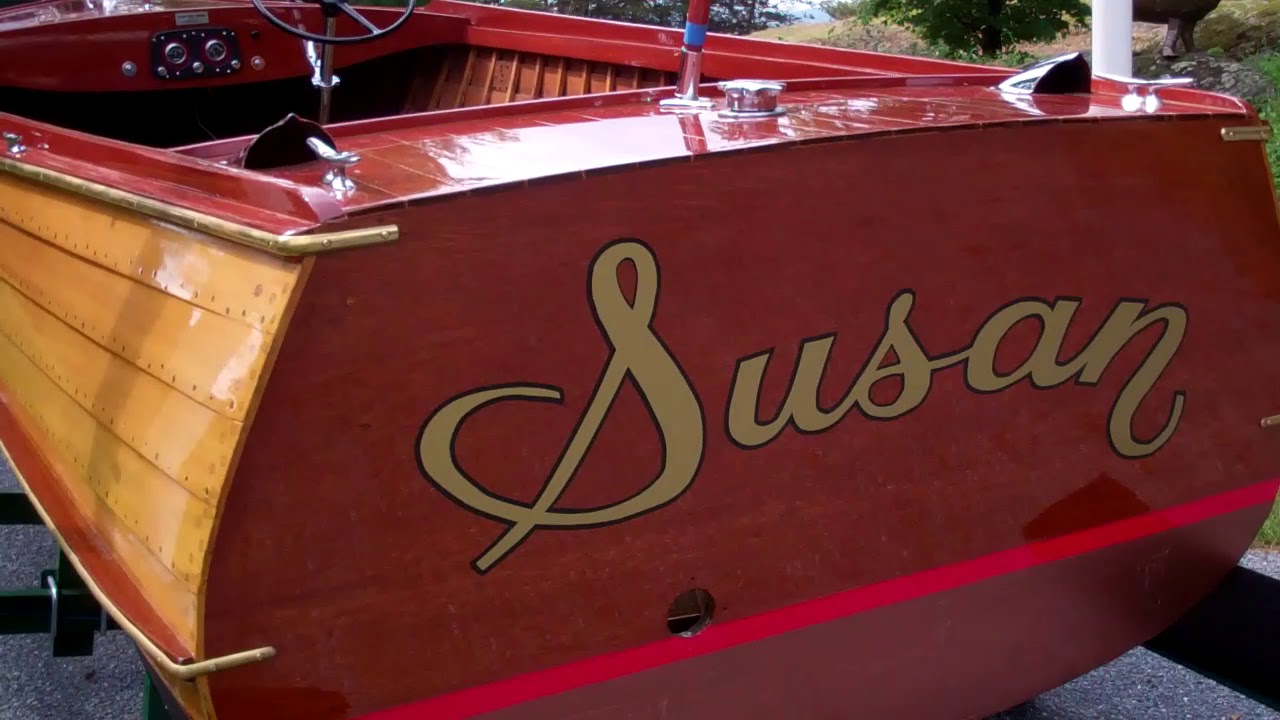
Susan, our 1940, sixteen-foot LOA Lyman Yacht Tender, HIN 10151, with aft facing aft cockpit is oh, oh so close to the finish line.

Yes, she was Susan when new, so our vinyl master duplicated that freehand font and Susan she will be until a future steward can express her/his preference for some other name. That said, I chose 7-year vinyl and will not varnish over it, which facilitates simply peeling it off if a future owner wishes to without doing any damage to the varnish.

A REQUEST: Her original 12” x 18” ensign was in tatters and worse when I bought her, so I am searching for a period, or at least period-correct, but not-brand-new ensign. Anybody have one I can buy that will become Susan’s? Thanks.

Other boat obligations forced us to banish her to storage for a bit, before we install her windshield and seating – the latter will return from upholstery soon. We are also waiting on an exhaust elbow, as the one bolted on when she arrived was, well, junk.

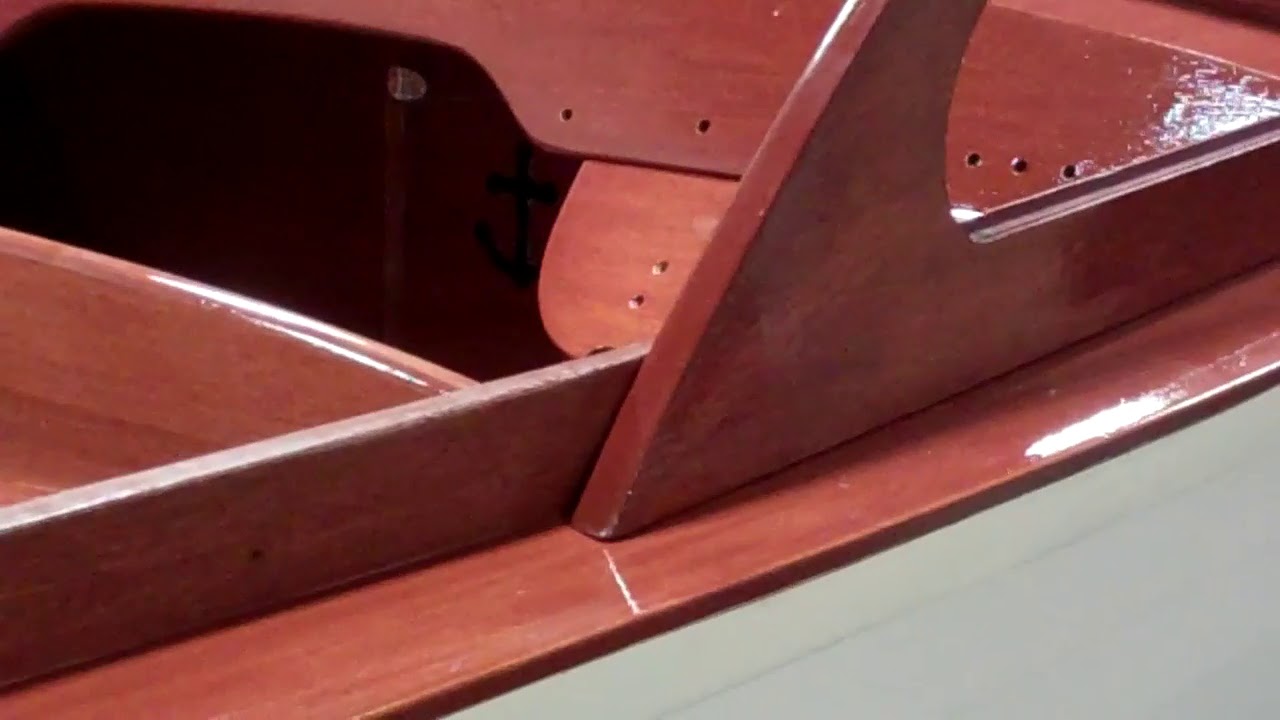
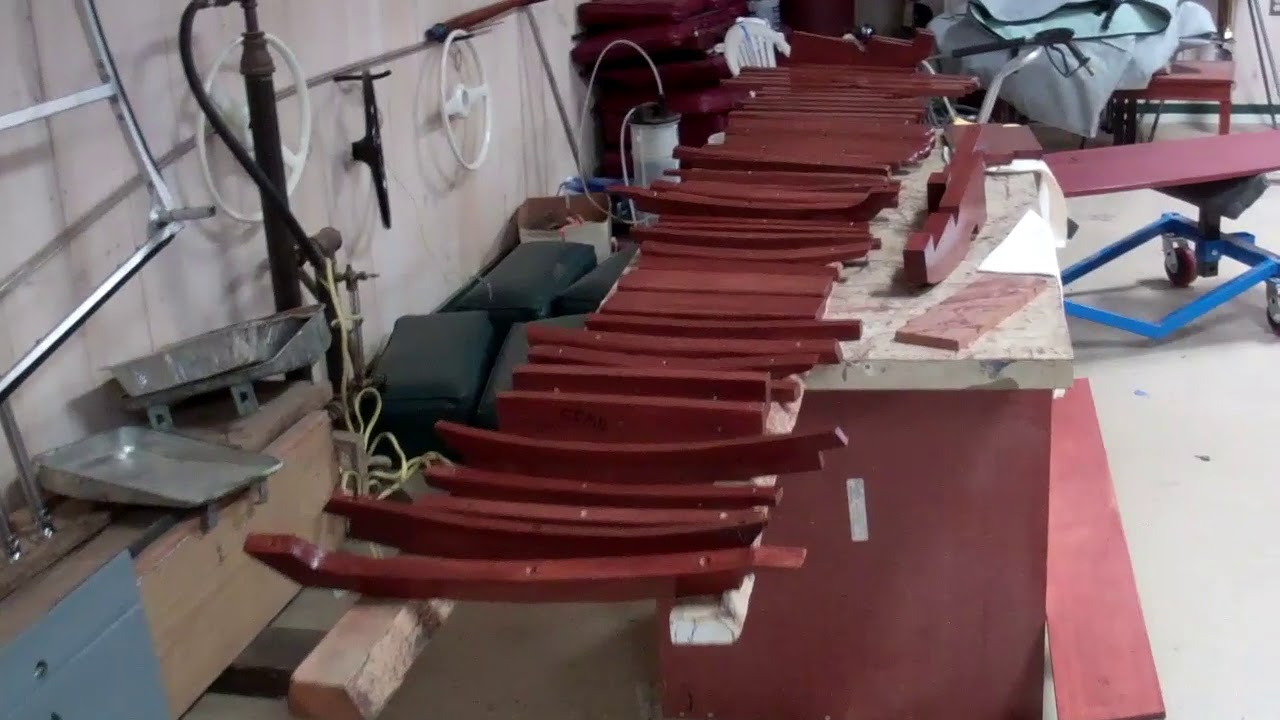
She is fitted with Cypress hullside strakes down to the waterline and mahogany from there down to the keel. She is rather stunning mahogany everywhere else. Viewing the clip surely puts a spotlight on her mahogany.

Save for one small, rectangular Dutchman repair just below her starboard rub rail and just about at the helm station, 99.99% of her wood is original. Every rib and every frame member are original and one-hundred percent rot-free. The one .0001% is the below-deck bow light backing block. We replaced it.

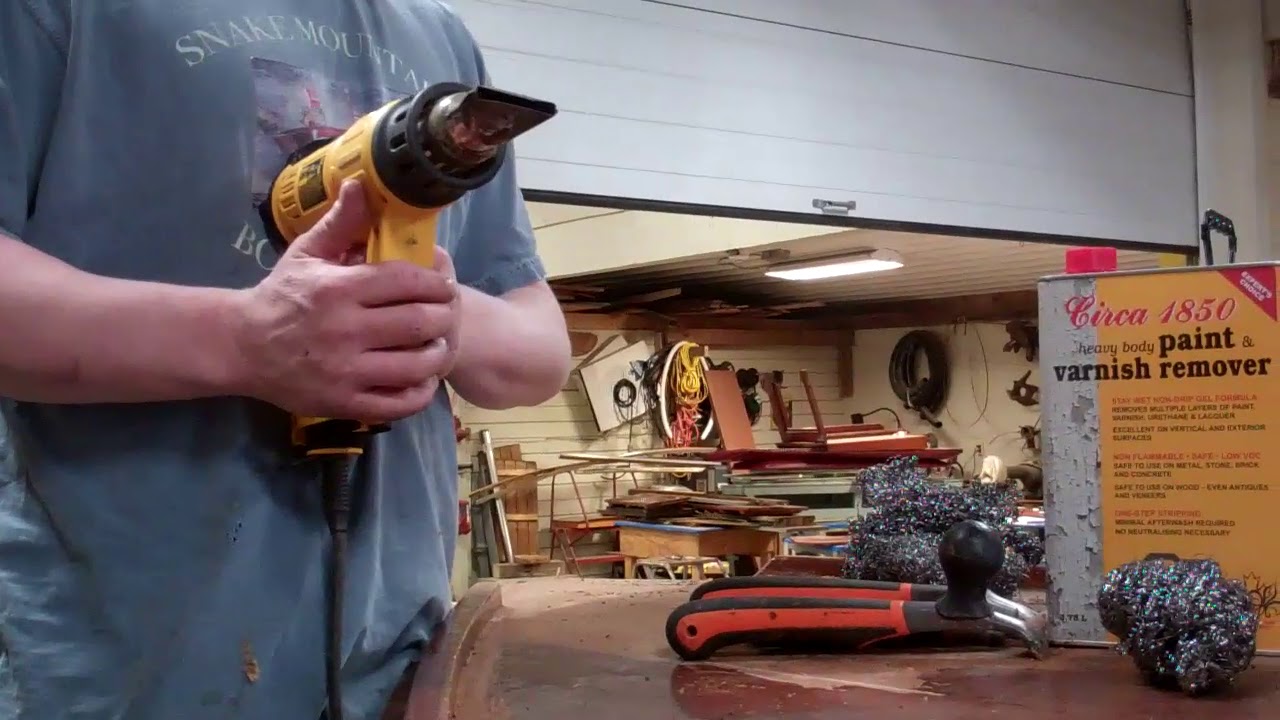
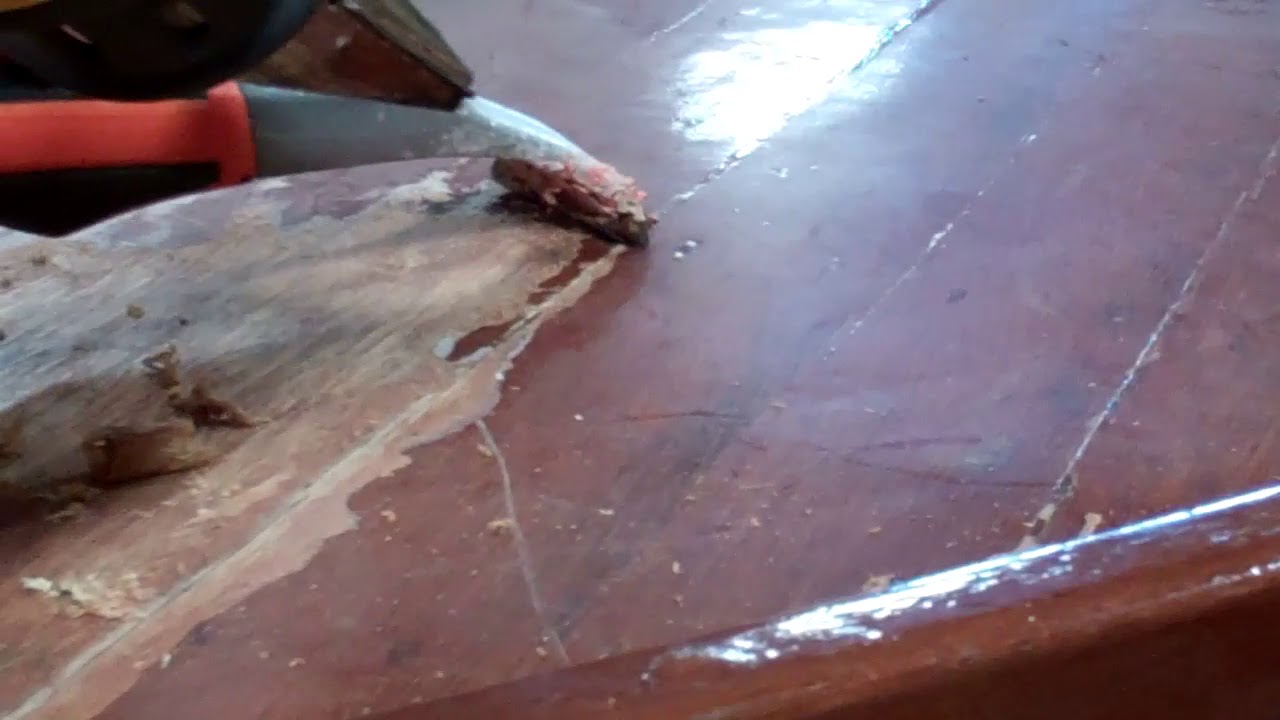
We stripped her to bare wood inside and out, stem to stern and started back, beginning with RJ and I sanding and finishing her interior hullsides and bilge while she was upside down. RJ has yet to forgive me, but gives credit to me for having suffered through at least half of this torture.

The interior hullsides received multiple coats of Sikkens Cetol Marine, and we applied three plus coats of SANPACO Lyman Sand Tan Bilge Paint to the entire bilge and all of its components.

Her bottom seams were sealed with TotalBoat Thixo Flex from Jamestown Distributors before we applied three coats of CPES and three of Pettit Tie Coat Primer 6627 and four coats of Sandusky Lyman Copper Bronze Antifouling Bottom Paint.

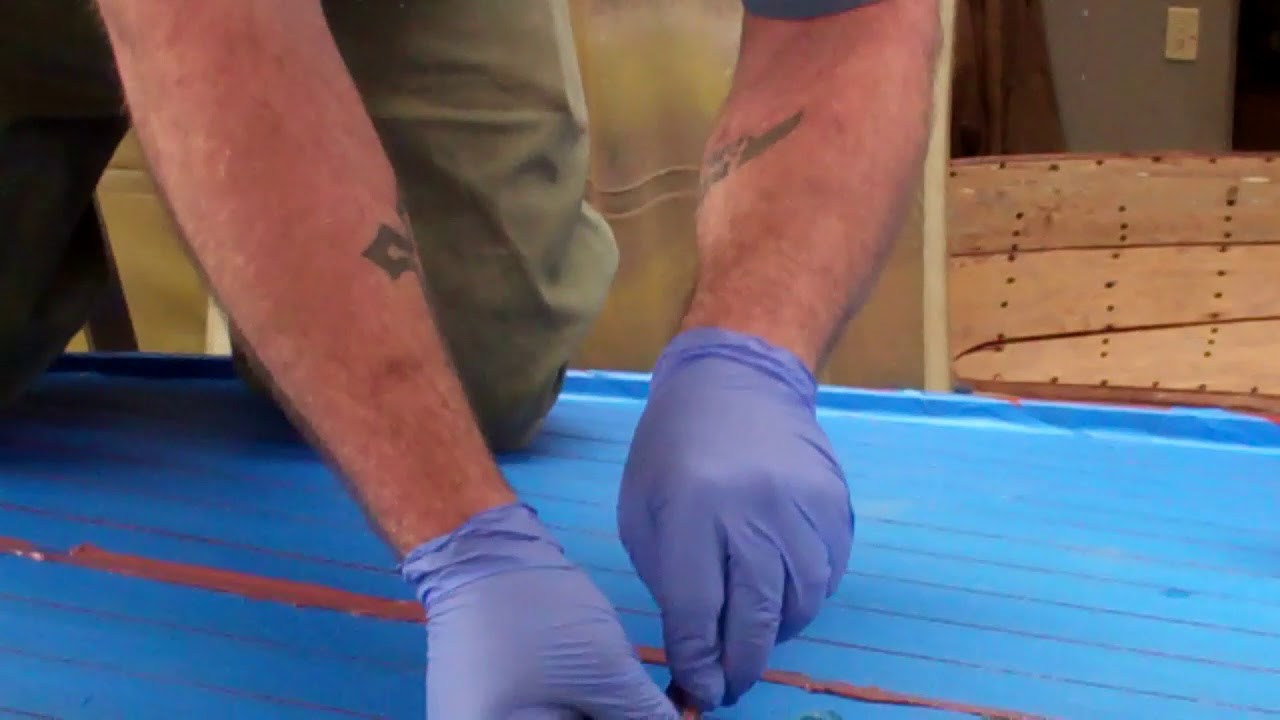
Deck seams were filled with Sikaflex 290 LOT – Mahogany based on a former owner’s memory.

After sanding everything fair, we bleached decks and hullsides as well as every “loose” component.

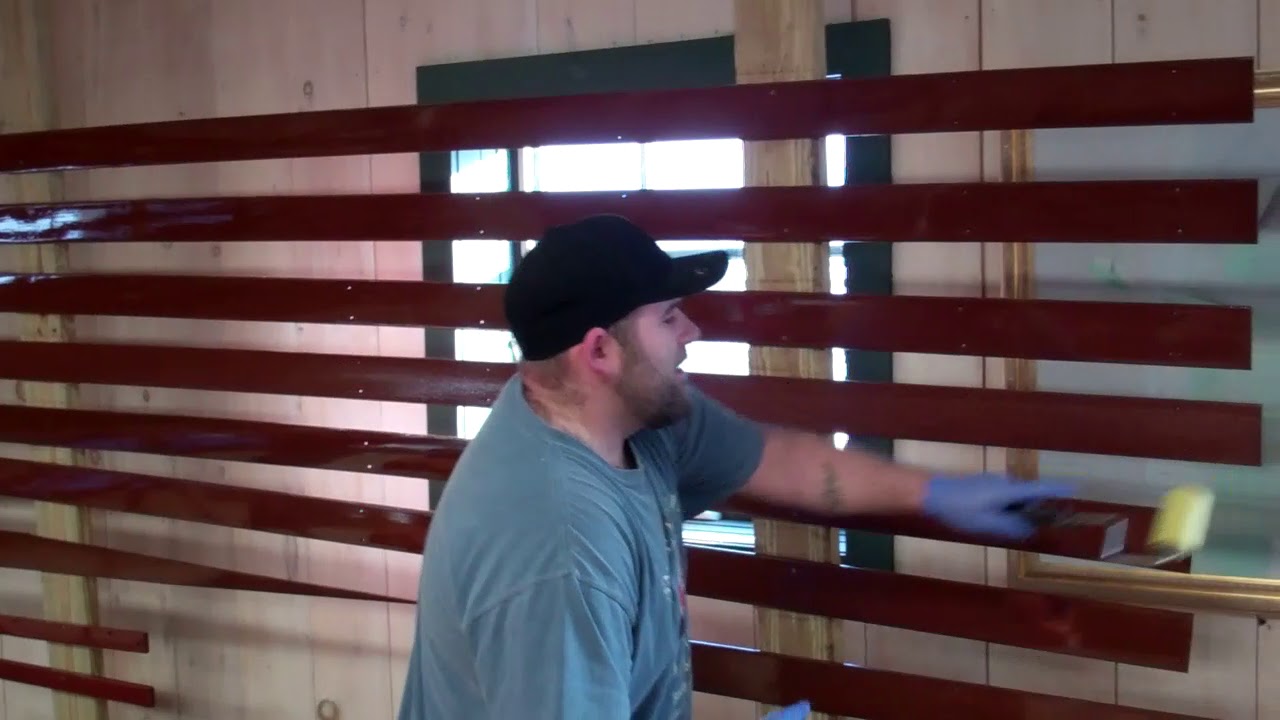
We stained using mahogany components with Lake Oswego Boat Company “Lyman” Gel Stain. The Cyprus hull sides received natural Gel Stain, and then the varnish marathon began. Pettit Hi-Build followed by the last two coats of Pettit Captains Varnish Ultra Clear 2067

OMG! Thirty-two coats later, my crew decreed, “That’s spectacular. Enough already!” Indeed, the gloss is a mile deep.

Preservation team:

Gauge Restoration: Shauna Whiting, Kocian Instruments, Forest Lake, MN
Metal Restoration: Mickey Dupuis, Custom Metal Restoration, Holyoke, MA
Engine Rebuild: Robert Henkel, Peter Henkel INC., Marine City, MI
Woodwork and finishing: Snake Mountain Boatworks LLC’s crew

Maybe, maybe, maybe we can pull everything together by Labor Day. Might even celebrate a bit as she romps across Lake Champlain!

1957 Lyman Runabout Sea Trial Milestone Passed!

1957 lyman runabout sea trial

There’s nothing quite as rewarding is seeing over a year of blood, sweat and, yes, sometimes tears than watching our 1957 23-FT Lyman Runabout splash and cavort across the water. We spend many hours late yesterday afternoon sorting that #$%@+ carb out, but Blind Date shows everyone today that we finally did so. She’s so beautiful roaring across the water, growling all the way. Guess there’s not much else to say!

1957 Lyman Runabout Engine Run Test Milestone!

1957 lyman runabout engine run test

It “only” took us a bit over a year to reach today’s milestone, but it is here, and the engine run test went, well, pretty well, given that the engine sat for so long post-rebuild.

As you see in the clip, it ran beautifully and strongly, albeit with some stumbling, for about half an hour.

Then it began behaving like it was starving for gas, and finally was clearly in some distress. The carb was out prime suspect, so we pulled and disassembled it, only to find that, over the last year plus sitting in the shop, where temps and humidity rise and fall daily. The combination of the condensation and the carb sitting gunked it up, simply put. The jets were clogged and the float was sticking. (I guess I needn’t share our faux pas with the community, but am doing so to share the education we experienced today.)

Joe and RJ broke it down completely, cleaned it thoroughly to the point that it and all its components are now squeezy clean.

We bolted it back on, hooked all the linkages and choke up, and hit the key. That’s all and a bit of tuning was what she wanted.

She now roars to life, idles smoothly and accelerates without stumbling. Now she is running like a Swiss watch for sure!

We’ll have her on the water tomorrow, which will be her first time in well over 20 years.

Yes, we will be shooting video for her sea trial.

1957 Lyman Runabout Varnish & Assembly

1957 lyman runabout varnish assembly

So many parts. So much staining and varnishing!

But with 90 percent of the varnishing behind us, we have focused on assembly.

A word of caution when you attack saving one of these wonderful Lymans. Consistent with Lyman practice, we installed Nautolex Marine Vinyl Flooring in Natural to all of the floor panels. The results are simply spectacular, as this rich mixture of hues compliments that the mahogany ceilings, engine box and seating in a manner that delivers coherence.

However, Nautolex sheets are almost one-sixteenth inch thick. Once you apply it to the face and wrap it around the edges, you have added almost one-eighth inch to each panel’s thickness. And, since these panels run beneath the helm seating, if John had, not accounted for that extra thickness, none of the components would have fit. John did and they do fit. Phew!

Even the varnish’s film thickness makes a difference when reassembly begins.

Bottom line, all of us must think and plan for how various coatings will alter dimensions.

Altering the floor levels at the helm so that they are level with the rest of the floor did give us a surprise. This alteration also changed the position of the shift lever pivot relative to the floor such that the lever could not be installed on the original mounting block.

RJ and Joe once again demonstrated their resourcefulness by simply installing the floor panel beneath the mounting block after they wrapped the latter in Nautolex, which renders the block almost invisible. Here is a great example of less is more.

The coaming is secured with screws passing vertically and countersinks plugged with mahogany bungs. I suspect it is more personal choice than anything else, but we applied the first ten coats of varnish to the covering boards first, and now have installed, stained and sealed the coamings. (Yes, they are bedded in 5200.)

We will complete the final varnishing of the decks, covering boards, coaming, transom and firewall, and continue assembling her over the next week or so, at which time her hardware will be installed. Then she will be off to upholstery, canvas and lettering.

With 59 degrees Fahrenheit today – and back to the twenties next week, it’s sure difficult not to at least dream about seeing her floating. But with Lake Champlain frozen solid from shore to shore, I fear we’d be insulting her terribly by dragging her down there now!

1937 Lyman Cruisette – How-to Strip Varnish & Stain

1967 lyman cruisette how-to stain varnish

Stripping paint and varnish from antique and classic wood hulls must be the least rewarding element of their preservation. It’s all about getting it off.

That it is a cliché’ is immaterial. Preparation is 95%+ of great wood boat preservation. Cleaning the wood completely, until all traces of penetrating stain or surface coatings have vanished, is the cornerstone of thorough and complete preparation.

And, what with grain typically running in multiple directions, great care must be taken that the scrubbing involved here does not raise a forest of cross-grain scratches in the process. While we do sometimes reach for the heat gun when stripping paint, chemical stripping is our go-to method, especially when stripping bottom paint. The chemical stripper encapsulates any lead that might be released by the stripper, where there is danger in using a heat gun that exceeds 1,100 degrees Fahrenheit, the temperature at which lead vaporizes.

Stripping varnish with a heat gun has advantages, not the least of which is that the waste flakes off in a dry state, which obviates the need for taping areas off lest dribs and drops of chemical stripper fall on them. But, as is evident in the clop, and RJ’s implicit expressed disdain for heat, it is both slower and potentially more damaging to wood, especially those portions of the hull that will be finished bright.

Burning the wood or dissolving the glue in plywood strakes of a lapstrake hull is the major risk when going the heat gun rout. Indeed, the blackened mahogany tells us that someone must have stripped our 1937 20’ Lyman Runabout’s hull sides with heat. What we found beneath the many, many layers of black paint and primer is a veritable sea of blackened leopard spots.

Fortunately, Eagle’s strakes will be painted. Even more fortunately, the same person did not strip the decks, covering boards, windshield and coamings, for sanding through the singed areas would require major thinning of the planks.

We are standardized on three BAHCO-Sandvik ergonomic scrapers and the wide variety of BAHCO carbide blades. Both are available from JamestownDistributors.com and Amazon.com.

  • BAHCO-Sandvik 650 Premium Ergonomic Carbide Scraper, 1”, 2” and 2.5” – a one-handed scraper
  • BAHCO-Sandvik 650 Premium Ergonomic Carbide Scraper, 1”, 2”, 2.5” – a “big dog” two-handed scraper with a knob just behind the blade.
  • BAHCO-Sandvik Premium Ergonomic Carbide Scraper, 1” – a small detail scraper
  • BAHCO Heavy Duty 2-Inch Replacement Scraper Blade #442
  • BAHCO 449 L-inch Triple-Edge Triangle Scraper Blade

While we do occasionally give competing brands a chance to outperform it, nothing we’ve tried holds a candle to Jamestown Distributors’ Circa 1850 Heavy Body Paint and Varnish Remover. Period., at least during our nine months of winter when cold temperatures, snow and ice make stripping hulls outdoors with one of the spray-on strippers at best impractical.

Finally, after trying a dozen or so brands, we have settled on New Star Foodservice 54460 Extra Large Stainless Steel Sponges Scrubbers sold by Amazon.com. (https://www.amazon.com/gp/product/B00…)

RJ takes you through the steps needed to arrive at you clean wood goal.

  • Strip the surface material – varnish or paint – using the chemical stripper of your choice.
  • The Chemical Rout
    • Apply the stripper three times, allowing about 20 minutes working time between each of the coats.
    • Scrape with the wood grain using the two-hand scraper and long strokes.
    • Apply another coat of scraper. Let it work for five minutes or so and repeat the long-stroke, two-handed scraping.
  • Apply the stripper again, wait a minute or so, reach for the stainless-steel sponge scrubber and scrub the surface briskly with the grain until the wood is dry.

Avoiding produce long, deep scratches that result if excessive down pressure is applied. While we continue using the same sponge for job after job after job, reaching for a new one, which will be less aggressive on the wood, might be a good “first-time-through” strategy.

Congratulations! You have reached the clean-wood goal and are ready to bleach!

1967 Lyman Cruisette – Rot Unveiled When Varnish Stripped

1967 lyman cruisette rot under varnish

We truly believed we’d found any and all rot existing on Eagle’s hull, but forgot a major reality. Some sort of stained paste filler and varnish, which is what was used on parts of the foredeck and elsewhere on her hull, can hide all manner of deterioration.

In the Eagle’s case it hid rotted foredeck planks on both port and starboard along the seam between the covering boards and deck planks.

We now face releasing the coamings and dashboard if we wish to address these issues, and the required plank replacement properly.

This rot strengthens our resolve that the deck, coaming, windshield and covering boards be stripped to bare wood.

Additionally, as I strip the foredeck using a DeWalt LCD heat gun (https://www.amazon.com/DEWALT-D26960-…), Sandvik Ergonomic scraper and BAHCO blade (https://www.jamestowndistributors.com…) . I have been exposing more of that paste filler under what appears to be precious few coats of varnish.

As I will amplify in our next update, just releasing varnish, whether chemically or using a heat gun, is only the first step in cleaning the wood. As is clear in the clip, scraping away the varnish leaves a residual-stain-mottled surface behind.

All of that stain must be scrubbed and bled out of the wood using Circa 1850 Heavy Bodied Paint & Varnish Remover (https://www.jamestowndistributors.com…), stainless steel pot scrubbers and lots of elbow grease. How clean is clean? You will know when you get there.

I will go into these last topics in greater depth later today.

1957 Lyman Runabout – How To Varnish

1957 lyman runabout how to varnish

So close!

One more coat of varnish tomorrow and installing our 1957 23’ Lyman Runabout’s ceilings can begin on Monday! Yahoo!

Joe and RJ have commandeered what used to be our showroom already, but yesterday they assaulted the walls as well. While they are ugly as sin, these rough racks make it possible to varnish pieces in a vertical attitude, which guarantees against any sort of dust contamination.

(They also increased the “parts-varnishing carrying capacity” by almost fifty percent!) We will hang seating, engine box and related panels on the racks for final varnishing once the ceilings are in place.

Her owners have been super patient, bit I know they are READY to begin seeing parts going into place and her “innards” coming together.

They are not alone! We are soooo ready to beginning the assembly and transformation from huge cavity to an accommodating, inviting and super functional cockpit.

1957 Lyman Runabout – How to Varnish update

1957 lyman runabout how to varnish

Happy New Year from RJ, Joe and Michael at Snake Mountain Boatworks LLC!

We spent the first day of 2019 the same way we spent the last day of 2018, making progress bleaching, staining and sealing the 1957 23’ Lyman’s seating components, ceilings, windshield frames, engine box and on and on.

By the end of today we put another milestone in our wake. Her decks, covering boards and dash received their first two coats, on the way to at least 15, of Pettit Hi-Build Varnish. Almost better is having applied several more coats of varnish on most of the components.

The last of the bleaching with Daly’s A & B Wood Bleach is behind us. Tomorrow these components will be scuff-sanded and stained, which will be followed by applying three coats of Smith’s CPES. In answer to several questions, except on very small pieces, we achieve much more uniform CPES layers by using a 3” yellow foam roller in place of a chip brush – which sheds hairs – or a foamy, which can come apart quickly as the foam reacts to the CPES.

For sure she will be in the water in spring 2019!

1940 Lyman Yacht Tender Paying Sikaflex Into Deck Seams

1940 lyman yacht tender paying sikaflex into deck seams

With her decks bleached with Daly’s Wood Bleach, sanded with 80 grit, stained with a Wood Kote Jel’d stain – red and brown mahogany in a 2:1 ratio – and sealed with three coats of Clear Penetrating Epoxy Sealer, Joe announced, “Let’s see how my years of window glazing and auto striping experience translate into delivering absolutely knife-edge deck seams.”
Let’s just say that Joe proved himself to be a master seam striper! With RJ assisting, the aft deck is finished and they are pulling tape from the completed foredeck as I type.

My 1940 16’ Lyman Custom Yacht Tender will be ready for varnish next Monday.

Lyman fabricated this model’s decks are simply carvel planked, but without any interior battens. The athwart frames are closely spaced, so the decks are plenty strong, but the seams are completely open and must be filled at least part way to render the decks waterproof.

We are using Mahogany Sikaflex 291 LOT, with the acronym standing for Long Open Time, which gives us ample freedom to work at a measured pace. The seams were filled almost to the top at their edges, but with a concave profile, which is consistent with my research and other boats in this model line built between 1938 and 1940.

Joe began taping using three-quarter-inch Scotch blue painter’s tape, which lines each edge, followed by a one-inch-wide strip that covers the plank completely. He very much wants to share from his experience that pressing the tape down and onto the wood’s surface with pressure across its width is critical to avoiding driving the Sikaflex beneath the tape, which translates into ragged, rather than knife-like edges. (He has one request, “Even though it is more expensive, Frog Tape produces a tighter seal and straighter line than Scotch Blue does. Pressing the Frog Tape down firmly completely seals the edge)

Note to self: order some Frog Tape for the next deck seaming.

All Sikaflex is applied in the same direction, and the tape is pulled in the same direction, from the beginning of each seam at the helm to its terminus at the bow. Doing so ensures that the Sikaflex separates from the tape cleanly and consistently.

Additionally, Joe admonishes that, “The bubble chases the gun. Take great care to cut the tube’s tip at precisely forty-five degrees, with an at most one-eighth-inch orifice. That way, squeezing the gun presses the material down and back into what precedes it. Remember, the bubble chases the gun. Reverse direction at your peril.”

Clean-up uses lots of Interlux Special Thinner 216.

People often ask how long procedures like this one take. Joe spent about five hours yesterday, and he and RJ worked about four hours this morning. The entire process used up about three tubes of Mahogany Sikaflex 291 LOT.
Varnishing her decks, so they can begin catching up to the nineteen coats on her topsides, transom, windshield, engine box and seating components!

1940 Lyman 16′ Yacht Tender Staining Update

1940 lyman yacht tender staining

With nineteen coats of Pettit Easypoxy Hi-Build varnish applied to her topsides, transom; and engine box, seating and windshield components; it is time to turn our focus to the decks, coamings and rub rails of our 1940 16’ Lyman Custom Yacht Tender with aft-facing aft cockpit.

Lyman offered this basic hull configuration as a yacht tender like mine, but also as a runabout. Whether the aft cockpit faced forward or aft was the buyer’s choice. He or she could also order a windshield that folded down or one that was fixed. Mine is fixed.

My research also suggest that the fore and aft deck seams were sealed with a mahogany caulking material that only filled the seam channels about two-thirds, with the rest left open so she presents herself with strong lines, lines that help offset the reality that she is quite beamy for her length. (We wull use Sikaflex 291 LOT in mahogany.)

Today we are applying Sandusky Chris-Craft red mahogany filler stain? Why not the somewhat browner Lyman mahogany stain? Again what few period photos I can find and the several of these vessels built between 1938 and 1940 tended to have a somewhat red cast, which in this case will complement the blonde Cypress topsides rather nicely.

Additionally, in our experience, the red morphs toward red-brown as we apply the three coats of CPES and the Pettit Hi-Build that will follow.

CPES is next, and will be applied on Monday, the first two coats with the second following the first immediately per Danenberg, with a third coat applied Tuesday morning.

Filling the seams will be next, followed by the initial coats of varnish, a process that will continue until we reach twenty-two or so coats.