1954 Penn Yan Captivator Aristocrat Transom Bottom Preservation

1954 penn yan captivator transom bottom preservation

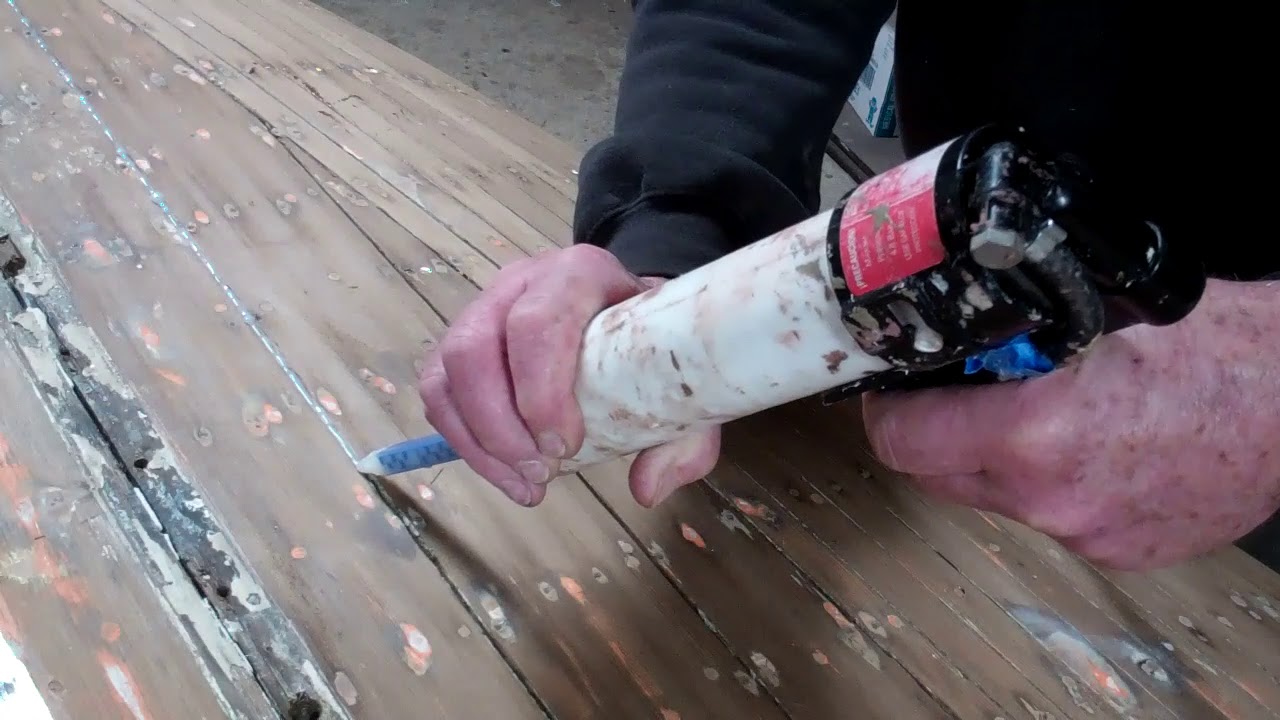
Penn Yan Striptite hulls’ below-waterline plank seams are notoriously difficult to render watertight. We have used Interlux Seam Compound For Underwater Applications in the past. No longer. Once in place, the Seam Compound is pretty good at 3M 5200 is not. In fact, because it becomes increasingly hard and inelastic post-curing, 5200 tends to tear the wood fibers along the seams, or at least lose adhesion. This earlier video on the Captivator Aristocrat illustrates why 5200 is NOT the answer. Henceforth we will reach for TotalBoat Thixo Flex, which pays easily, adheres tenaciously and remains flexible when cured.

Here is the video I shot while paying the Thixo Flex.

We use a piston-driven pneumatic caulking gun for this purpose, and not one that is air-driven.

Why? The Thixo Flex is packaged in two compartments in its tube to which a mixing tip supplied with the product has been attached. Since one component is much more viscous than the other, an air-driven gun tends to dispense the lighter component first, and therefore in proportions that keep it from curing.

A piston-driven gun, much like an hand-activated gun, dispenses the two components in precisely the correct proportions, such that the payed material is semi-cured in 24 hours or less, depending upon the ambient temperature.

Bottom line. If you will use a pneumatic caulking gun for dispensing Thixo Flex, be sure it is piston-driven.

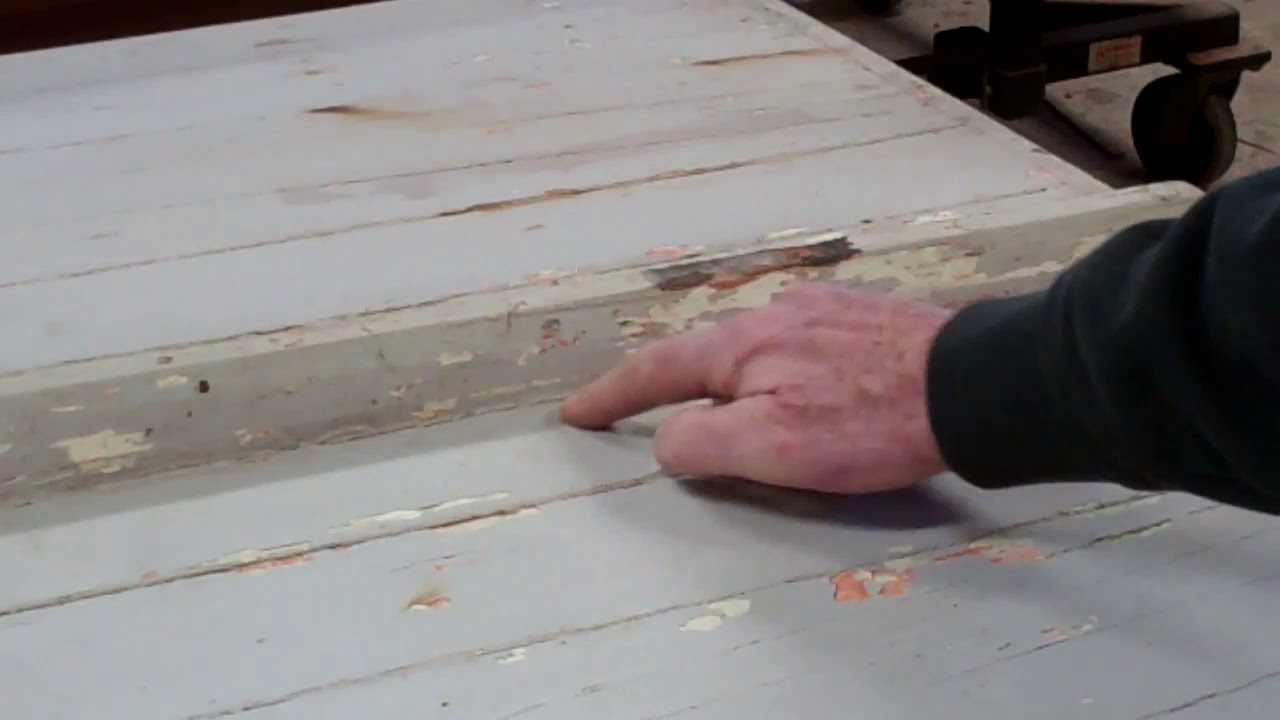
One additional caution. Because it remains flexible post-curing, Thixo Flex is hellish difficult to sand and tends to load sandpaper quite quickly. RJ and Joe spent the afternoon sanding the bottom with six-inch random-orbit sanders and 80 grit paper, and went through one-and-a-half boxes to reach a clean, fair surface.

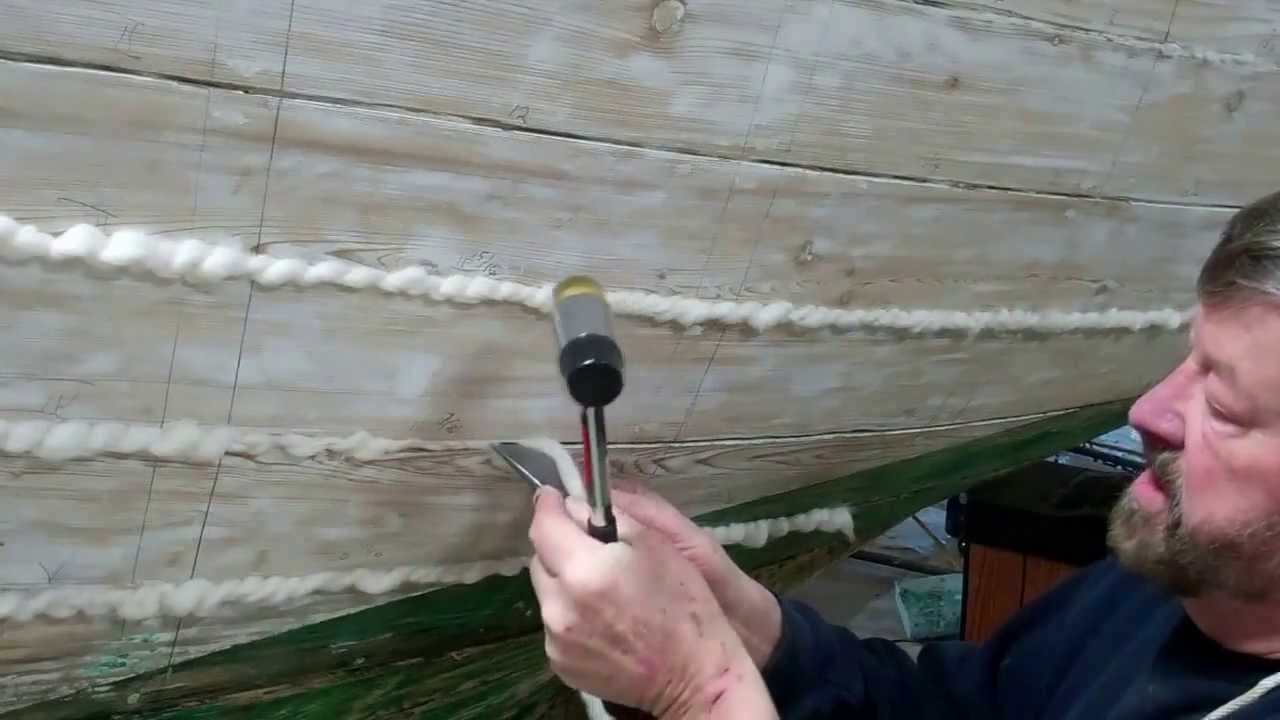
Not surprisingly, we discovered multiple holidays – air bubbles, mostly – that we will fill in a final pass across the bottom.

Transplanting a new transom into the hull has also passed a major milestone. The new transom and its interior framing have been fabricated. Its interior surfaces have been sealed, stained and varnished, and it is ready for mounting on the hull.

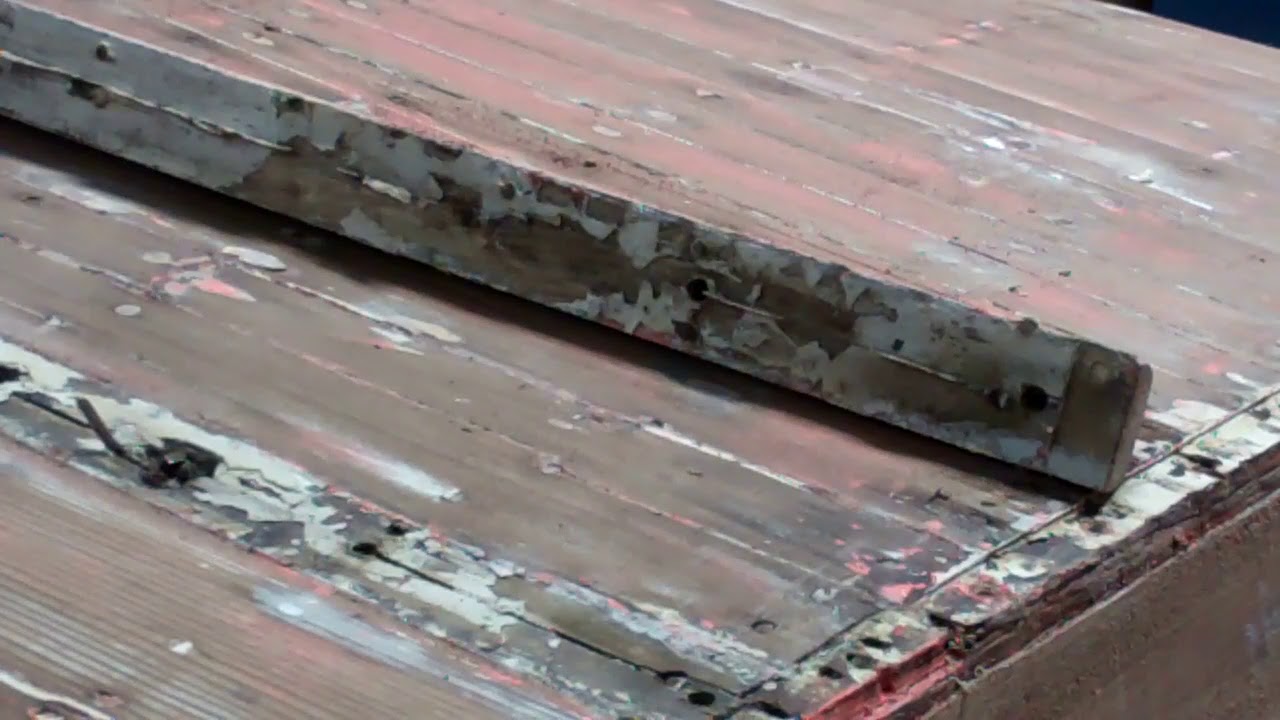
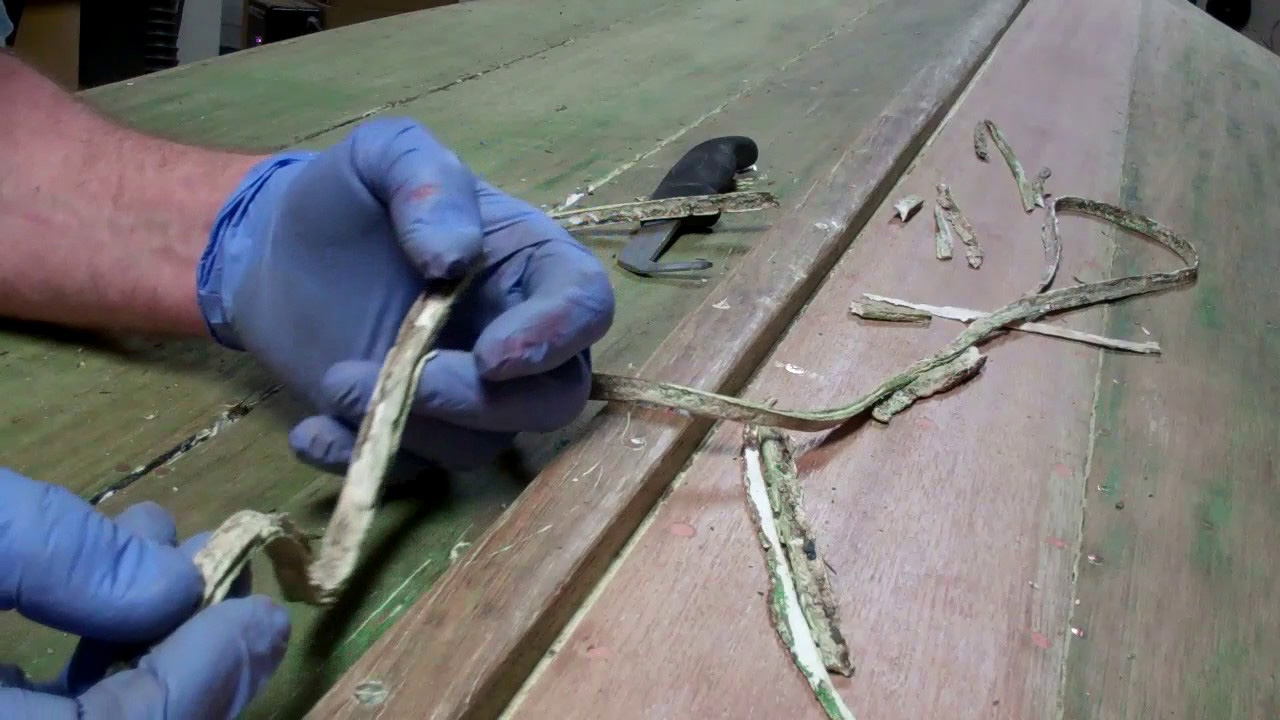
First, however, we had to deal with the thin strip of mahogany that is attached to and runs along the interior surface of the planking tails. Much of it was rotted and came out with the failed transom. We had to excise the rest of it using a MultiMaster, followed by fabricating, steam bending and inserting a new strip in place.

Once the 3M 5200 has cured, probably several days from now, we will release the forest of clamps and mount the new transom.

With her topsides already stripped and ready for sanding, staining, sealing with Clear Penetrating Epoxy Sealer and varnishing, the pace should pick up over the coming weeks.SHOW LESS

1954 Penn Yan Captivator: How to Seal Bottom Seams using Thixo Flex

1954 penn yan captivator seal seams

Sorry about the behemoth compressor firing up in the “background.” With five preservation projects fully engaged right now, I cannot simply shut the shop down when I shoot a video.

Finally, I am confident we have solved a chronic wood boat preservation conundrum, “My boat has an original bottom with open seams. I do not wish to, or in the case of a Striptite hull cannot, install a True 5200 Bottom. Nor do I typically drop her in the water where she lives all season. What are my options short of waiting for her to swell each time we launch and hope to use her?”

Hmmm …. Our stock answer has been, “Use Interlux Seam Compound for below water applications. It will remain elastic, compressible and able to withstand the swell-shrink cycle, even if the movement is miniscule, without overly compressing the wood on each side of the seam.” Save for two cases where a boat came back for new bottom paint and we found that some of the Seam Compound had become hard and brittle, I am still comfortable with it as a product that solves the problem. However….

OMG! Even when heated, it pays very, very poorly, and will fight you every inch of the way. What’s worse than all the time involved, Interlux recommends three applications.

There must be something better, especially in terms of ease and time cost of application.

I recently answered a query about the best material to use when sealing lapstrake topside strake seams with a small fillet. Our practice to date has been 3M5200, as long as the fillet is tiny, tiny in cross section, and any feathers beyond it are removed. One of you answered simply, “Use West G-Flex and you will be good.”

Hours and hours of subsequent research tells me that this person is correct. However, while two-part G-Flex is supplied in squeeze bottles and quart cans, Jamestown Distributors offers Thixo Flex, a TotalBoat brand version that is also two-part, satisfies G-Flex’s criteria for adhesion and lasting elasticity and is packaged in 10 oz. caulking tubes along with a mixing tip that delivers material in a fine stream that comes out having been mixed precisely.

Our tests, albeit only over several weeks rather than several years, and painfully small sampled, delivered a bond that is flexible and simply cannot be torn apart unless the wood fibers fail. After paying a seam’s worth, I use a super flexible putty knife to drive the material into the seam. (A plastic spreader may work as well, but I prefer the putty knife.)

The waste is scooped and spread into the next seam.

I should be able to finish the Captivator’s bottom spending about 2+ hours per side. Paying Seam Compound would take time measured in days, by contrast.

Once the Thixo Flex has cured, and after we’ve checked for any pin holes or holidays, we will sand the cured residue off the planks and seal the entire bottom with three full coats of Smith’s Clear Penetrating Epoxy Sealer.

Priming it with three coats of Pettit Tie Coat Primer 6627 will follow.

We must install the new transom bracing and transom before we can finish paying TotalBoat Thixo Flex into the bottom seams, however.

Step-by-step…

1954 Penn Yan Captivator Aristocrat Post Stripping Findings

1954 penn yan captivator stripped hull

Yesterday we stripped her transom, flipped her, released her splash rails and stripped her bottom. Happily the splash rails are in excellent condition. They only want to be stripped, have some minor “bodywork” executed and refinished.

Today we released the keel and began releasing the keelson and the transom framing.

While the keel is in excellent shape, both in terms of being straight and sound, it has been off the boat at least once and sealant was given short shrift when it was last installed. As a result there is some rot, not so much that it cannot be repaired, on the garboards where they lie beneath the keel and the keelson.

Her owner informs me that the keel was not released by the shop that worked on her in 2007-08, but the myriad of plugged mounting holes tell us that it was released sometime prior to that work being done.

The paucity of sealant means that water will find its way into the bilge.

It will also sit in the bilge. That there is not more rot is testimony to the care given her by her current owner.

The rot we did find beneath the keel is far forward, and at the joint between the keel and the lower portion of the stem. That curved section runs from its joint with the keel up to the splash rails.

Once we have the keelson and garboards out of the hull, everything, garboards, keelson and keel, will be cleaned to absolutely bare wood. Once the components have been sealed and receive three coats of Clear Penetrating Epoxy Sealer, they will be set aside.

Next comes the most fun. The failed transom, which we must replace, must be released from the hull. That it is secured with many, many copper nails, and not wood screws, makes this task particularly challenging, but doable using a FEIN MultiMaster and the thinnest, narrowest blade we have. (That they are copper, and therefore quite soft, should translate into the MultiMaster zipping right through the nails leaving a clean surface behind.

1954 Penn Yan Captivator Aristocrat Flipped

1954 penn yan captivator flipped

We’ve flipped all sorts of boats, big wide ones, long deep ones and now our 1954 Penn Yann Captivator Aristocrat.

Forget the winch. No grunting needed. Her size, narrow beam and cylinder-like cross-sectional shape made flipping her hardly different from rolling a 5-foot diameter pipe.

Now that her bottom is fully exposed, I must say that I was surprised just how little paint is on it. We will know better once we begun stripping, but my guess is a couple of coats of red lead primer followed by about as many of some sort of gray paint.

The garboard-keel seams on port and starboard, while open, appear to be less so that we thought they were while lying on our backs looking up at the hull.

Once we have released both splash rails and masked her topsides, we will reach for the Circa 1850 Heavy Body Paint and Varnish Remover and strip the bottom down to raw wood.

We will surely share what we find and how we will attack the issues we unearth then.

1942 Century Imperial Sportsman: Why Filling Seams with 3M5200 Is Forbidden

1942 century imperial sportsman 3m5200 not seam filler

This morning’s 1942 Century Imperial Sportsman preservation project update is a plea, “Please, please do not pay 3M5200 into below-waterline seams.”

It is an adhesive, not caulk, pure and simple.

I have lost count of the number of otherwise wonderful woodies who arrive at the shop presenting curtains of old 3M5200 – stalactites – hanging from the bottom plank seams.

Once cured, 3M5200 will not compress when wetted planks try to expand. The result? Here is stark evidence of what happens next. The planks buckle and split, as several of them have in the ’42 Imperial Sportsman.

I have begun cleaning the seams using a curved pick and a reefing hook, supported by utterances that are for other than polite company.

As John noticed when he examined my growing pile of released 5200, “Most of this stuff never even adhered to the edges of the planks! Look at all the dirt and debris. So, not only did putting it in there buckle planks, it did not even work as an impediment to moisture infiltration!”

Right and right.

OK, what will we use in its place? I am opening seams that are up to 3/16” wide, which is at the outer limit of what it can bridge effectively, but we will use Interlux Seam Sealer for below-waterline applications. It cures, holds paint, and makes a watertight seal, but, even when cured, it never becomes hard. It compresses as the planks expand and expands if/when the planks shrink.

After applying the CPES and one coat of Interlux 2000E barrier coat primer, we will work up to three coats into the seams until they are almost fair with the planks. The wider seams may require more.

Some folks use Life Caulk for this purpose, a product I have used for bedding sailboat deck hardware, but never below the waterline, so I really do not have a view on its efficacy or appropriateness for this purpose.)

Then we will apply four more coats of the 2000E before we apply one coat of Pettit Tie Coat Primer and at least three of the deep, dark green topcoat our owner has approved. (Since she will be a trailer boat, We will likely reach for a paint like Interlux Brightside or Premium Yacht Enamel, unless we can find a gloss hard bottom paint.)

How to Caulk Seams With Cotton Roving – Palmer Launch Roxanne

vintage boat caulk seams cotton roving

Carvel planked construction leaves spaces in the seams between the planks that are traditionally caulked with cotton caulking. Here I am about one-third finished caulking Roxanne’s topsides, and share how I go about this process with you

The tools are very low-tech: two caulking irons, a plastic-headed hammer, a smallish plastic pail and a hank of rope. The cotton caulking arrives packed in one-pound packages of loosely coiled “rope.”

Before the caulking begins, I roll the cotton into balls somewhere between a large orange and a small grapefruit in size. After dropping a couple of balls into the bucket, hanging it around my neck, I grab the hammer and sharper, smaller of the two irons and proceed with step one of stuffing the seams with cotton caulking.

The goal in this first step is to create what looks all the works like braided rope. The cotton passes through the palm of my hand and beneath the iron, as I successively capture approximately one-inch-long lengths against the plank below the seam, slide it up into place and drive it home with a couple of taps of the hammer. It is amazing the rhythm that begins to take hold: grab, slide, tap, tap; and over and over until the entire length of the seam is filled. Then, using the blunter, wider iron set at an angle, I attack the “rope” and drive it home until the cotton disappears into the seam.

Once all seams are filled, the cotton and edges of each seam must receive a copious coat of oil-base paint, preferable one that is consistent with whatever the final topside paint will be, We will use Interlux Pre-Kote on Roxanne since our topcoat will be Interlux Premium Yacht enamel 220 — semi-gloss white.

Before we can begin our finish painting, however, we will fill and fair all of the seams using Interlux white Seam Compound above, and Davis Slick Seam below the waterline.