1956 Chris Craft Capri Topside Fairing

1956 chris craft capri topside fairing

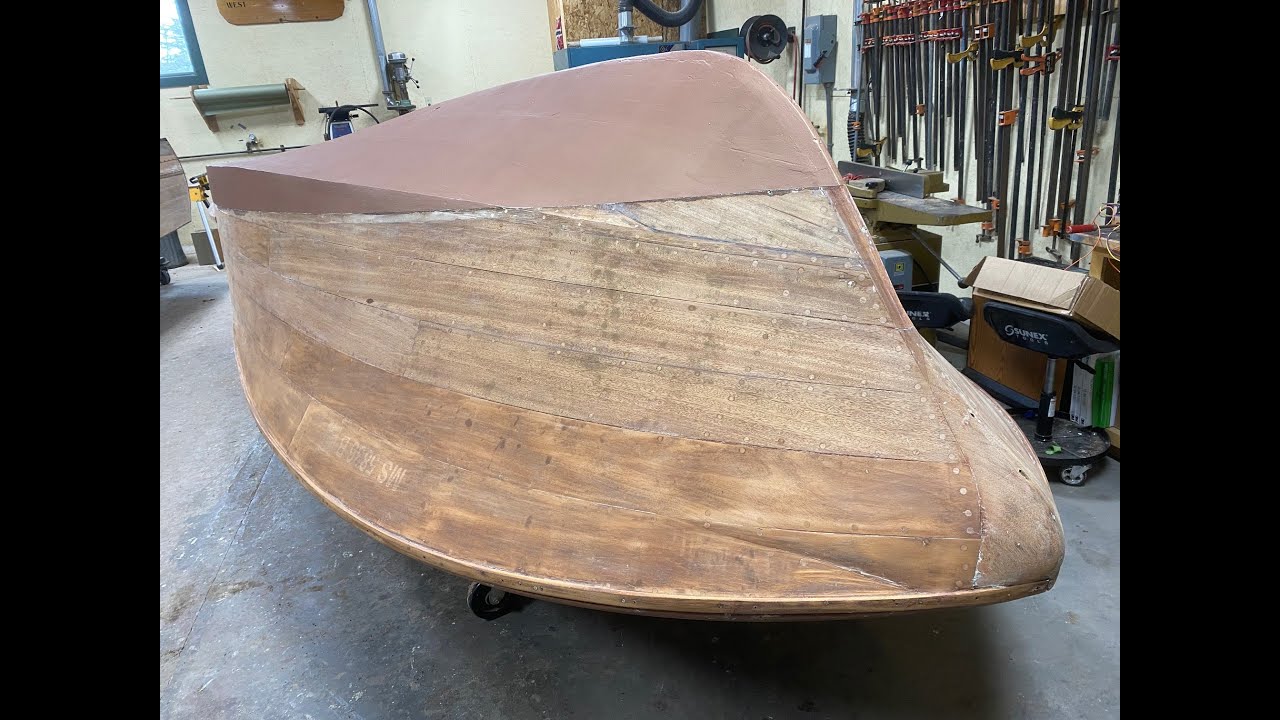
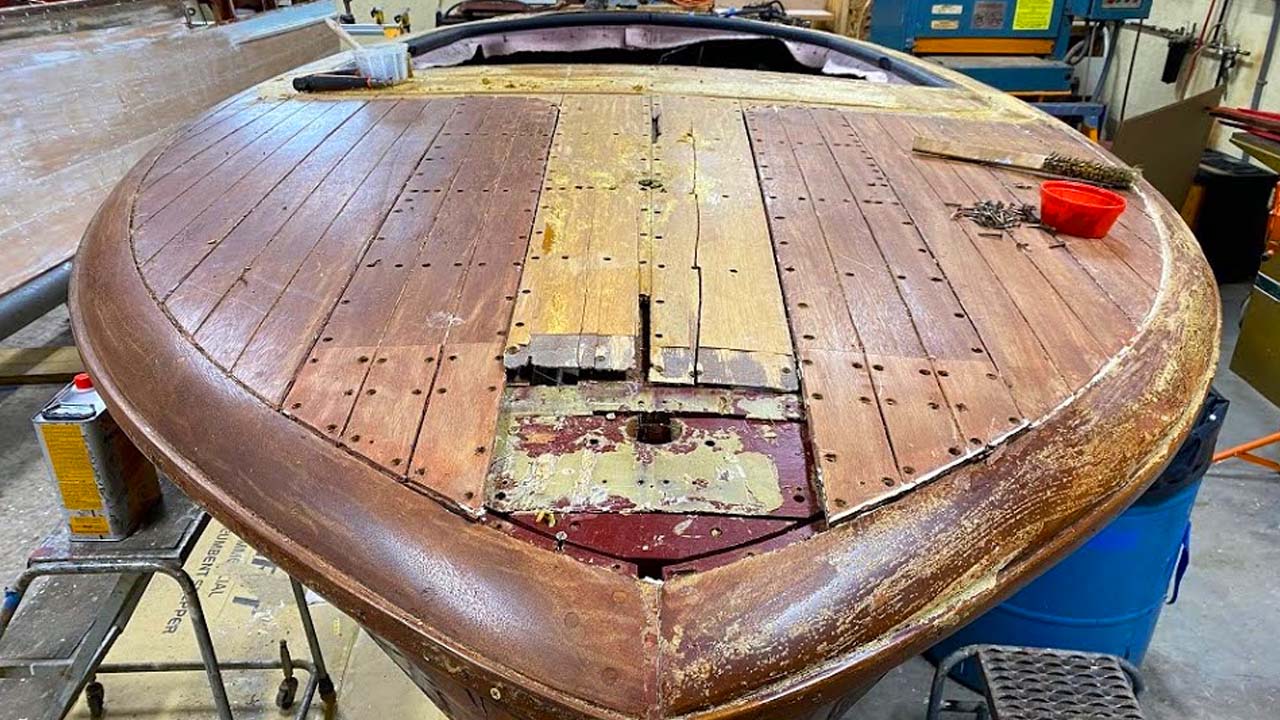
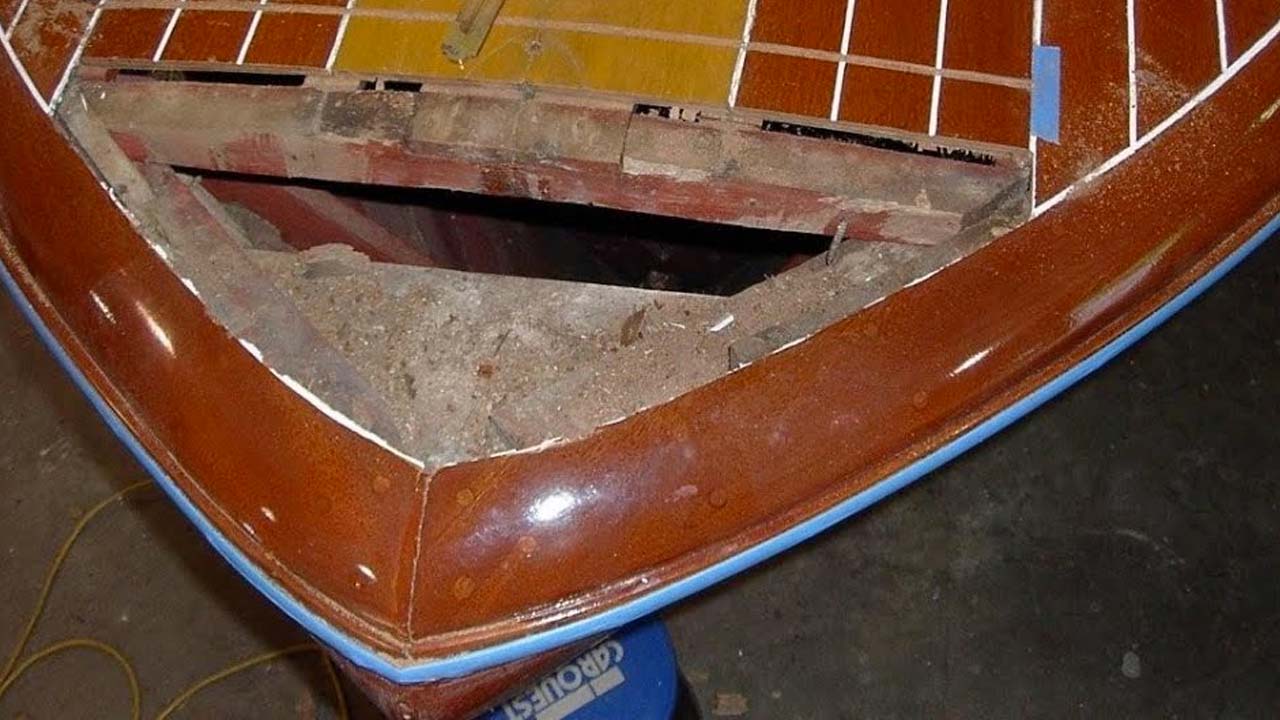
How I wish that wood boat enthusiasts and self-styled restorers never discovered orbital or random orbit sanders! Why? There is no better way to transform reasonably fair planking into a moonscape. Sadly the guys who butchered this 1956 19’ Chris-Craft Capri Runabout were not satisfied with destroying her foredeck, her engine bay hatch cover and so much more. Nope. They also felt a need to have their way with her using orbitals.

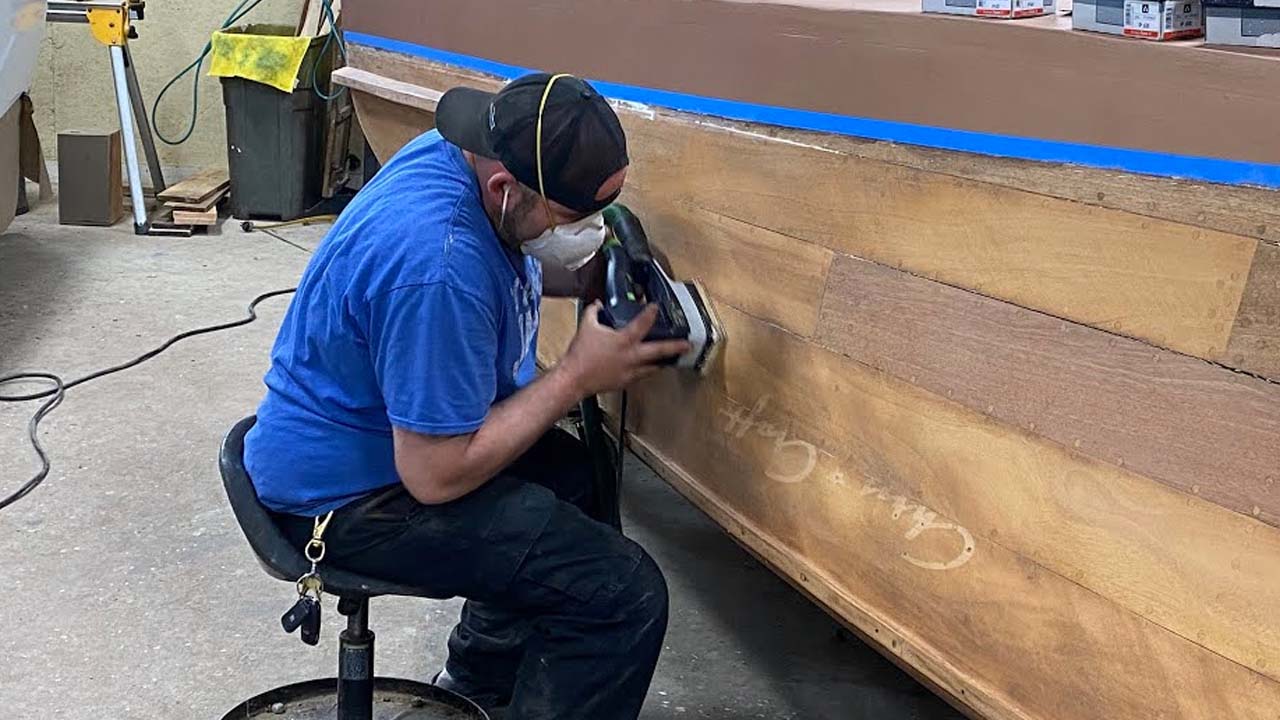
We have her topsides stripped, and I began doing some sanding while we were closed, but Joe is our go-to guy for fairing hullsides, decks, transoms and more. Now that we are open and working behind locked doors, Joe can turn his attention to fairing her hullsides to perfection.

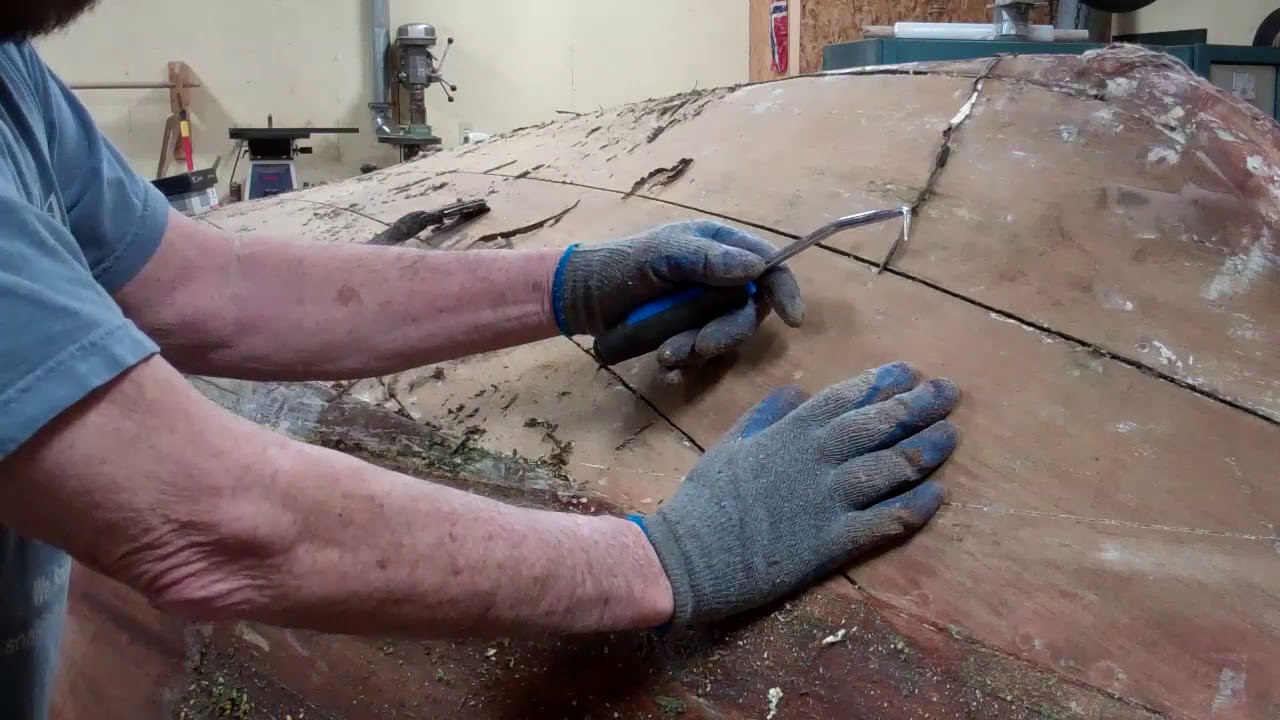
Doing so, however, is hugely time consuming. Using only an inline sander, Joe begins by drawing slanted pencil lines every few inches along the hull. If the surface is fair, the sander follows the surface and the line evaporate uniformly. However, the damage the butchers wrought was immediately evident when we began sanding and only bits and pieces of lines sanded away. He will sand across the grains, guided by the lines until he reaches the stern and has the entire hullside absolutely fair. But now he must sand with the grain until all the deep 40 grit scratches are gone.

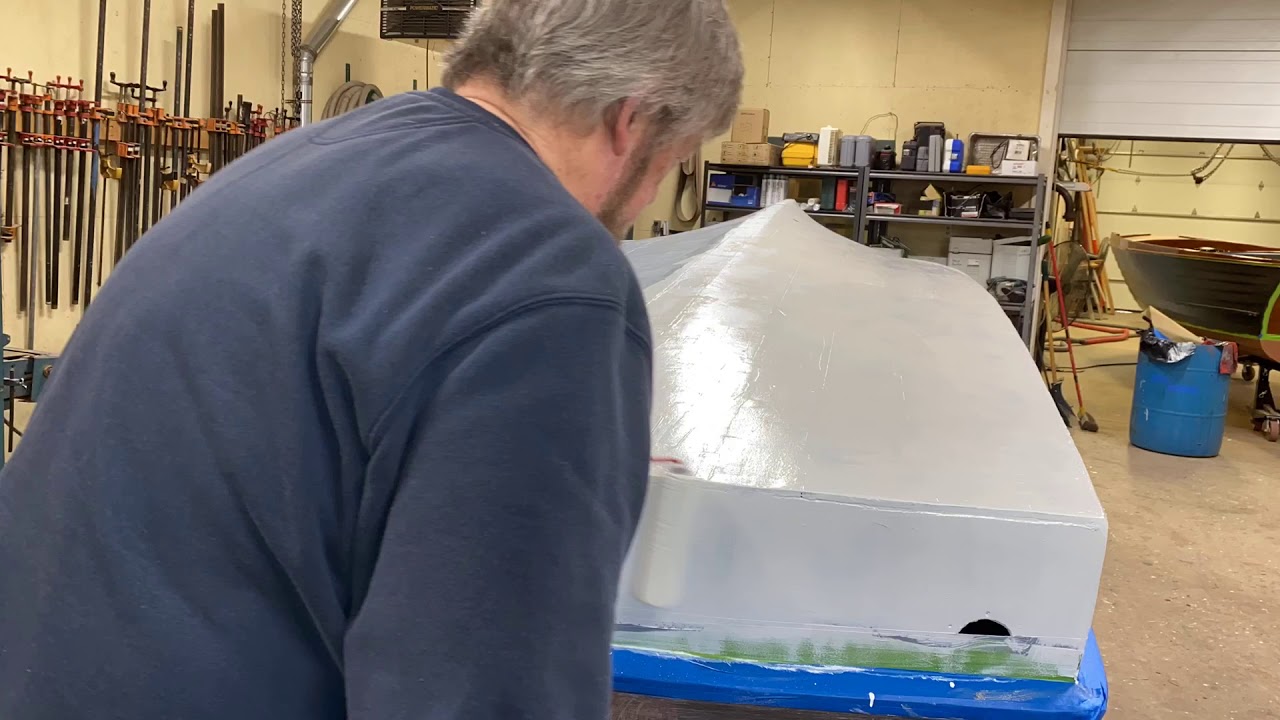
(We would normally reach for our Hutchins 16” longboard pneumatic sanders for this task, but, thanks to Mr. Murphy, all three of ours decided to fail today. A new one is on its way and it will be used for the next stage of Joe’s fairing process.)

That will be accomplished by first sanding with the grain using 60 grit, followed by doing so one more time with 80 grit.

Then it will be bleaching time, and bringing out the Daly’s A & B Bleach, which we mix 3:1 B:A, which achieves an absolutely white snow field once the wood dries after being kept wet continuously for at least six hours.

Staining is just peaking its head over the horizon. Soon ………..

1956 Chris Craft Capri Bottom Preservation Milestone

1956 chris craft capri bottom preservation

Our 1956 Chris Capri 19’ runabout’s preservation roared past a major milestone today. Her bottom is

• Filled the countersinks using 3M Premium Marine Filler and then faired the bottom again using 80 grit paper

• Applied an additional coat of CPES

• Primed with five coats of Interlux Interprotect 2000E Barrier Coat Epoxy Primer

• Painted with two coats of Pettit 1933 Copper Bronze Antifouling Bottom Paint

Her chines and from the bow back about four feet, I applied a third coat of the antifoul to compensate for the extra scrubbing action water racing by the hull imparts in those areas.

We also used Frog Tape, which we warmed to achieve a knife-edge line between the bottom paint and what will be the white boot stripe.

And next? As is clear from the thumbnail photo at the front of this clip, sanding her topsides fair and then bleaching them with Dalys A&B Bleach mixed 1:3 parts A and B to maximize bleaching await me.

And to think my dear wife was concerned I would not find enough to do to keep me occupied during our extreme isolation!

I know all about the fallacy of composition, and, yes, it is but one data point, but the fact that I had to mow 6” tall grass today, on April 19, way up here in northern Vermont makes me even more concerned about Climate Change … Just sayin’.

1956 Chris Craft Capri – Interlux 2000E Bottom Coating

1956 chris craft capri bottom interlux coating

Here is a bit of fun – My first attempt at a time lapse video as I apply the third coat of Interlux 2000E Barrier Coat to the bottom of the 1956 19′ Chris-Craft Capri.

Tools:

  • Disposable roller tray
  • Seven-inch yellow foam roller cover
  • West System Epoxy roller covers are not required as I can apply a coat to the entire bottom using one low rent cover
  • Three-inch chip brush
  • Long sleeves for me and good rubber or latex gloves

Way too much fun …………………

1956 Chris Craft Capri Bottom Preservation

1956 chris craft capri bottom repair

Our 1956 19′ Chris-Craft Capri is today’s lab rat for a virtual clinic focusing on bottom work. Here is what is involved, or at least our standard materials list and sequence. No, I am not asserting that our way is the only or the best way. What follows below is what currently works for us today. However, preserving wood vessels is an evolving journey along which best practices and best materials evolve continually.

Remember that there was a day when paying 5200 into bottom plank seams was dogma! But flexible marine epoxy products were not even a glimmer on the researcher’s bench then.

Now, ALL we must hope for is that we are all safely on the other side of the COVID-19 Pandemic in time to have her in the water at least once this season!

PLEASE STAY HOME AND PLEASE STAY SAFE!

1956 Chris Craft Capri Bottom & Stripping

1956 chris craft capri bottom stripping

Our 1956 19-ft. Chris-Craft Capri has had a tough life, what with being assaulted by inept and worse “restorers” a decade or so ago.

We have recently reported on the travesties visited upon her decks, stem and engine hatch. Now that she’s been flipped, are we surprised to discover additional assaults perpetrated against her bottom?

The good news is that, save for needing refastening and a few minor repairs, her bottom planking is in excellent condition.

That said, and other things equal, she still needs a True 5200 bottom. However, as so often happens in life, other things are not equal. While her owner agrees that there is a True 5200 bottom in her future, given all we must preserve elsewhere on her hull and engine, it will not happen now, a decision we agree with based on our detailed and extensive examination of her bilge and its inner bottom planking.

The real issue in the bilge is lots of grease, oil and grime. Yes, that layer is pretty much gone directly beneath the engine, so we will release and execute repairs there. After we remove endless strings of useless cotton roving in some seams, roving that was not sealed with any sort of caulking compound, and yards and yards and yards of failed 5200 in others, we will refasten large parts of the bottom and then apply four coasts of Clear Penetrating Epoxy Sealer – CPES. We will then pay the seams with Jamestown Distributors’ TotalBoat ThixoFlex and sand the bottom fair.

Following applying three more coats of CPES we will prime with Pettit Tie Coat Primer and then apply three coats of Pettit Copper Bronze Hard Racing Bottom Paint.

Now that Methyl Chloride has been banned, and we can no longer source “good” paint stripper, we have turned to TotalBoat TotalStrip Paint Stripper. No, it is not what Circa 1850 was, but it is user friendly and we are adjusting to applying it and then coming back 24 – 48 hours later. It is still wet and has liquefied many layers of paint, even bottom paint, by then.

Finally, we’ve all faced challenges stripping concave hullsides. Using a standard, straight-bladed scraper risks leaving skid marks at each end of the blade while the center floats above the wood. A good friend suggested we try an Allway Tools 2-1/2-Inch 4-Edge Metal Tubular Wood Scraper, the blade edges of which are slightly convex. At only about $8 for a handle and 4-edge blade, why not? Bingo! It works beautifully … nary a skid mark appears behind each stroke.

It is available from Amazon.

1956 Chris Craft Capri Foredeck Repair

1956 chris craft capri foredeck

Shoddy butchers is the nicest thing I can say about the crew who raped the foredeck on our 1956 Chris-Craft 19’ Capri.

It would have been trivially easy to simply release these four planks. But no. Let’s just saw athwart the foredeck, fashion incredibly silly scarfs and rabbited joints using mahogany that does not come close to the original.

And why not at least bleach the entire deck so there is some hope that the new, incredibly mismatched planking at the bow melded at least a little with the rest of the deck. I have no idea how long these rapists were at assaulting this Capri, but it took us eight hours to extract all the worn-out screws, cut through whatever glue they reached for, and release the four planks and the patches.

Oh, and why oh why would these guys pay 3M 5200 where Sikaflex belongs?

It would have been professional to return everything to its original position using consistent, NEW silicon bronze Frearson wood screws, but no. Why not just reach for the screw recycling bucket and use whatever is in the first handful pulled out therefrom?

Then there is the truly shoddy work done at the bow beneath these planks. A major frame member is not even secured at its port end.

Enough. When we are finished, this travesty will be impossible to see.

And … Today was bilge-cleaning day for Anthony. Armed with a Sandvik scraper, a gallon of Roll-Off, and a quart into a spray bottle, he weighed in; sadly, not for long, however.

Starting deep down next to the keel and keelson, he began scraping the interior surfaces of the inner planking – the approximately eight-inch-thick planking that was laid in at about a forty-five degree angle.

“OMG!” erupted from the bilge. Anthony’s scraper buried itself in severely rotted wood with the first several swipes at scraping the external layer of grease off. We tested elsewhere with the same result. Virtually all of the bottom’s interior skin from the keel to the bilge stringers and from the helm station to behind the transmission is just gone.

Releasing the bottom is the absolutely last thing her owner wants to hear, but I am guessing that we will find similarly rotted exterior planking – at least on these planks’ inner faces – when we begin releasing the bottom planks.

At the risk of beating on a very tired old drum, here again is why other than guesstimating what preserving these ancient vessels will cost is tantamount to rushing into a fool’s errand.

1956 Chris Craft Capri Wiring & Bilge Issues

1956 chris craft capri wiring bilge repair

The Capri’s engine is out, crated and begins its trek to Peter Henkel, Inc. in Marine City, MI tomorrow.

While her owner reports that the engine has run reliably and strongly for at least a decade, we now know that it has also been losing copious amounts of oil and transmission fluid into the bilge. Indeed, the transmission had very little fluid in it, which probably helps explain the issues her owner has experienced with shifting and staying in gear.

This engine is plumbed in an interesting manner. For example, raw water is drawn in, but first passes through what appears to be a transmission cooler before continuing to the water pump. Perhaps this plumbing is a component of the Moroso kit that was used to marinize what had been an automobile engine.

We will learn much more once Robert Henkel lays hands and eyes on, and goes through the engine. All the fluids that have leaked from the engine and transmission over the years, perhaps decades, found a home in the bilge. The clip gives you a feeling for how much, but we pulled the engine yesterday, only to find several actual pools of oily fluid that has soaked into the wood by this afternoon. I can only guess what we will find once we have cleaned the bilge, flipped the hull and stripped off her bottom paint, especially what is left of it on the keel, garboards and related planks. We agreed with her owner that, if at all possible, we would not begin releasing bottom planking, but if we discover planking that is as oil-soaked as the bilge suggests it is, we will have no alternative. (She appears to retain her original planking, so just plucking off a plank here and there is near impossible. Remember, hundreds of ½’ slot-head screws and that sheet of canvas are lurking beneath the exterior planks.)

The wiring is an absolute nightmare, and dangerous to boot. The engine gets fuel via an electric fuel pump that someone wired directly to the positive side of the coil, which can if the wire is sized sufficiently large so that the pump is supplied with the voltage it needs without over-heating the wire. This boat’s pump is fed current from the coil via a 14 ga wire, which seems at least skimpy to me.

Beyond that, we have found seemingly unconnected masses and rats nests of all sorts of wire, most of which is not AWG, throughout the bilge and especially behind the gauges. (We will do our best to convince her owner that the truly safe course involves stripping all of it out and wiring it again from the get go.)

Since the bilge is oil-adulterated from just ahead of the shaft log through and to beneath the helm station, we must remove the rest of the seating, the bench seat bases and all of the flooring before Anthony and I begin fully enjoying going after all that grease and oil with putty knives, wire brushes and gallons of Roll-Off!

1956 Chris Craft Capri Preservations Begins

1956 chris craft capri preservation

We have launched the preservation of a beautiful 19′ 1956 Chris-Craft Capri that has been the victim of some “difficult” restoration over the years.

She has been re-powered several times and now has a GM 350 automobile engine in her bilge that was marinized using what appears to me an Osco conversion kit. We will know more once we have shipped her to Robert Henkel, Peter Henkel, Inc. in Marine City, MI (www.chris-craft-parts.com)

The engine is too long for its bay, so the lower forward pulley invades the aft cockpit about 2-3 inches. This fact forced someone to add a stand-off addition to the upper aft seating assembly, which, in turn makes the seat back uncomfortably erect. Correcting the latter issue means either moving the engine aft, which is impossible, or swapping engines, which seems to be overkill given the expense involved. (I will ask Henkel if he can install a shorter lower pulley and assembly.)

Beyond that, I will let my commentary with the clip convey the issues we must confront.

One added thought. Several times this week, potential clients have complained bitterly when I share the reality that, unlike auto repair which is billed by the flat rate book, the cost of preserving antique and classic boats is largely a crap shoot unless and until deconstruction is behind us. Even then, moving forward all too often exposes additional issues.

Bottom line. I can offer a ballpark guesstimate most of the time, but in no way can I be held to it. We will know how much it will cost when we are finished preserving her; not a minute before. Anyone who tells you otherwise is blowing smoke you know where.