1957 Lyman Runabout Deck Milestone

1957 lyman runabout decking

After a long winter of scrubbing, scrubbing and scrubbing the bilge and the hull’s related interior surfaces; spending endless hours applying Sandusky Lyman Sand Tan Bilge paint to all those surfaces, it is time to deck.

We are installing ribbon cut mahogany plywood that matches that Lyman originally used in its Sandusky, OH factory.

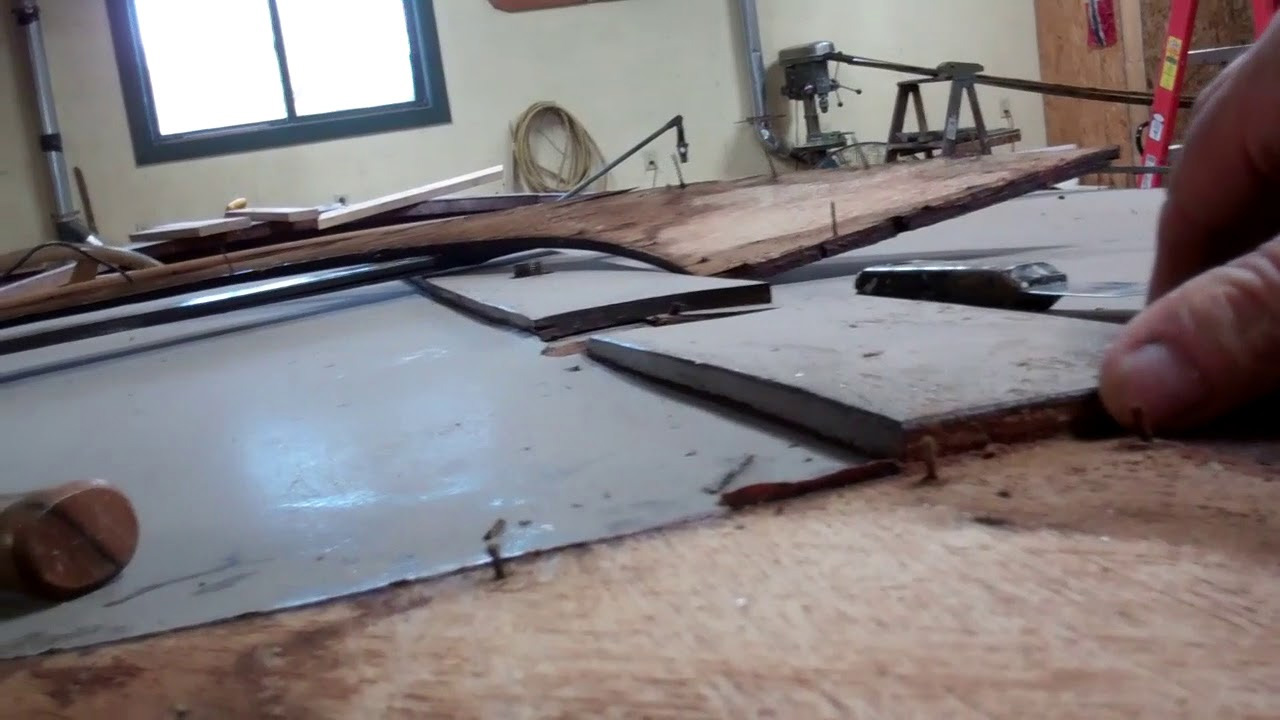
We use 3M5200 to minimize the need for fasteners. In fact, in for foredeck, other than along the rub rails, where they will be covered by the toe rails, down the middle where they will be covered by the king plank and the stainless finish nails driven along the dash, there are no additional fasteners driven anywhere through the surface.

Bending the panels over the framework produces all the down pressure needed to ensure significant squeeze out, which indicates the substantial downward pressure being generated there. The covering boards are also bedded in 3M5200 and secured with stainless finish nails driven in using a pneumatic nailer, which is also consistent with Lyman’s methodology.

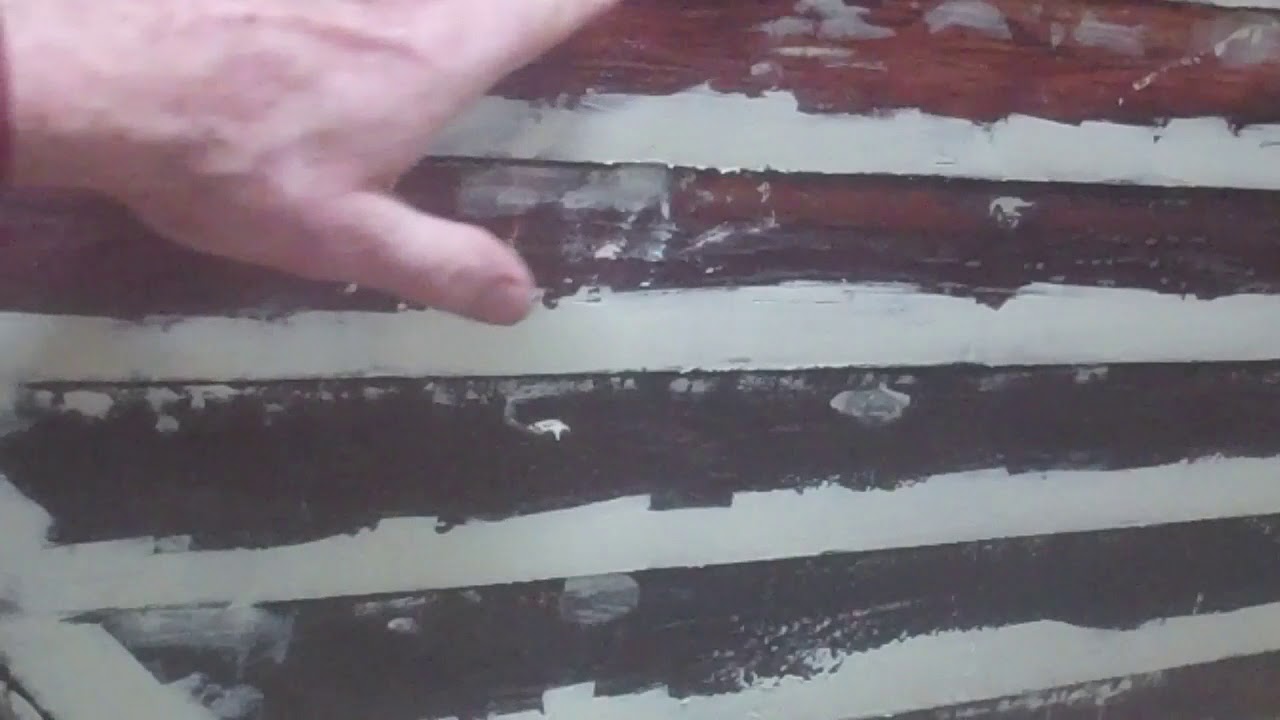
We employ 3M5200 in three colors. White is used along the rub rail, which produces a white seam between the top strake and rub rail.

Mahogany is used along the top of gunwale framing so that the interior seam between it and the covering board complements the stain and brite finish being applied to these components.

Tan is used atop all of the deck framing, which, along with the undersides of the deck panels, has been painted Lyman Sand Tan. The tan seam lines melt into the surrounding tan surfaces.

As will all other 3M5200 applications, we employ Interlux Brushing Liquid 333 and terrycloth shop towels to clean all squeeze out aggressively and completely. Left behind is the tiniest seam line we can attain.

Once we install the toe rails on the foredeck and the king planks, both fore and aft, her decks and covering boards will be ready for bleaching, staining and, yes, varnish!

Quite a milestone indeed!

1957 Lyman Runabout Exterior Paint Milestone!

1957 lyman runabout exterior paint

John and RJ grow weary of me asking, “Well, is she ready to float yet?” As of today, and save for installing the strut, prop and rudder, the answer for the 1957 Lyman 23-foot old style runabout is, “Yes!”

We have broken through the exterior topside and bottom painting milestone. Four coats of Pettit EZ-Poxy Hi-Build Varnish on her transom, leaving only eight to ten to follow.

Thank you for all the great questions on this project. Here is a summary that I hope answers the vast majority of them:

In order, reaching this milestone involved

  • Stripped the entire hull to bare wood from gunwales to keel and stem, including the transom planks, to stern using Circa 1850 Heavy Body Paint and Varnish Remover
  • Released all fairing compound from all fastener countersinks • Refastened and/or reset strake clench and rivet nails
  • Sand bottom and topsides fair
  • Sealed strake seams with 3M5200
  • Sealed the entire surface with three generous coats of Clear Penetrating Epoxy Sealer (CPES)
  • Faired above and below the waterline using 3M Marine Premium Filler – six applications with sanding between each pair
  • Sanded all bottom and topsides fair again using 80 grit followed by 100 grit
  • Applied another three coats of CPES
  • Primed bottom with Pettit Tie Coat Primer 6627 – three coats, sanded between coats two and three
  • Applied four coats of Sandusky Paint Company Lyman Copper Bronze Antifouling Paint
  • Primed the topsides with four coats of Interlux Pre-Kote Primer For One-Part Finishes
  • Applied four coats of fire red TotalBoat Wet Edge Topside Paint to boot stripe
  • Applied three coats of semi-gloss white Interlux Premium Yacht Enamel
  • Splash rails o Stripped, cleaned and sealed the rails with three coats of CPES
    • Coated the rails’ mating faces with TotalBoat Thixo 2:1 Fast Cure Epoxy and installed them temporarily against wax paper taped to the strakes – produced perfectly fitting mating surfaces
    • Installed the rails bedded in white 3M5200 and masked off from strakes o Primed – three coats of Interlux PreKote
    • Applied three coats of topside paint
  • Applied three additional coats of topside paint hand-sanded with 120 grit between coats
  • Transom o John fabricated two small Dutchman repairs to splits radiating from the exhaust port o Sanded fair using 80 grit
    • Stained with Wood Kote G’eld Stain o Sealed with three coats of CPES
    • Applied the first four coats of Pettit Easypoxy Hi-Build Varnish, hand-sanded between coats two and three, and very lightly after coat four.

The bilge is ready for a final coat of Sandusky Lyman Sand Tan Bilge Paint. Installing her decks and covering boards are next.

1957 Lyman Runabout Paint & Stain Update

1957 lyman runabout paint stain

What a difference a bit of attention makes!

  • She is sporting her red boot stripe.
  • Her topsides were sanded to 80 grit, faired with 3M Marine Premium Filler, final sanded with 80 grit, and then received two coats of Interlux PreKote primer.
  • Her transom received two Dutchman repairs, was sanded fair using 40-, 6- and 80-grit paper, stained and sealed with three coats of CPES.
  • Her remaining mechanical components were released and readied for preservation.
  • All interior hull surfaces and all framing were cleaned, sealed with CPES and received an initial initial coat of Sandusky Lyman Sand Tan Bilge paint.
  • Her new foredeck and aft deck panels and her king plank were fabricated using correct ribbon-cut mahogany marine plywood.
  • Most of her hardware was packed and sent to chrome.
  • Her Iva-Lite returned fully preserved.

Once John reaches for surface putty and repairs a series of dings that the primer revealed, we will be applying Interlux Premium Yacht Enamel to her topsides.

We will shortly seal her deck and gunwale framing with CPES, and then we can move to installing her decks and covering boards bedded in 3M5200.

This update affords us an opportunity to remind one and all of us to take great care when we tighten lifting ring assemblies. You fail to do so at your peril, as is clear from this clip. Someone must have trotted out a long bar to have extra leverage while securing the assembly. The result is a concavity around the deck’s center rather than Lyman’s characteristic and elegant crown.

We will address the issue using vertical bracing between the keel and the two deck frame members just forward and aft of the lifting assembly. Carefully applying upward pressure removes the hollow, but we will go slightly beyond fair so that the deck is properly convex once the panels are installed, the bracing is removed and the surface settles slightly.

From now to her post-conservation review sometime in May, she will blossom, becoming ever so much more elegant day-by-day and week-by-week. Yes!

1957 Lyman Runabout Foredeck Off!

1957 lyman runabout foredeck removal

With only applying SANPACO Lyman Copper Bronze Antifouling paint to the jack stand paddle areas ahead of us, RJ and I lowered the 1957 23’ Old Style Lyman Runabout onto a pair of boat dollies this morning.

He’s totally cleaned the interior of the topsides and bilge of all old paint, varnish and what have you. Now it is time to attack replacing the foredeck, toe rails and aft deck, and to release and refinish the covering boards between them.

The starboard foredeck panel was replaced at some time, along with the toe rails on both sides. Rather than use ribbon cut mahogany plywood, which is correct, the new panel is what we call totally incorrect swirl-grain plywood. That it is thicker than the portside panel does not help at all. I express the hope that we can save the toe rail material in the video, but, having released both of rails now, it is clear that major plywood delamination has assaulted both of them. I quickly stripped a section of the king plank, only to discover that it too is fabricated from swirl-grain plywood. The one positive is that whoever did this work was super lazy, or just did not know. Nothing is sealed on the back sides. Nowhere is there any evidence of adhesive having been applied between the decking material and the frames. All of the delamination we have discovered is the “reward” for taking such shortcuts. We will seal aggressively, and will set everything bedded in adhesive. We have no choice but to replace the king plank and both toe rails using correct, and likely slightly thicker ribbon cut plywood.

The aft deck plywood panels will be replaced as well thereby allowing her to present uniformly from stem to stern.

Once the deck and gunwale framing is exposed, it will be cleaned and then sealed on all sides with three coats of CPES. Why?

We spend incredible money and time staining, sealing and varnishing exterior surfaces, but so many of the boats arriving in our shop present completely raw interior surfaces. That raw wood is like a sponge that continually takes on and releases moisture, causing the wood to expand and contract beneath the wonderful varnish we have so lovingly applied.

For a while the varnish is elastic enough to expand and contract with the wood, but as it continues curing, it also loses elasticity, begins breaking down and ultimately fails.

We seal every piece of wood on every side we can get to. Bilges receive three coats of CPES and then three coats of the best bilge paint we can buy. If the boat is outfitted with ceilings, that bilge paint is applied from keel to gunwales.

The framing is doused with CPES, as are the underside surfaces of all deck and covering boards. Once sealed, the wood becomes very stable and finishes survive much, much longer.

Yes, all this sealing costs money and time, but once again, price and cost diverge. Just think of how much you save if your woody’s varnish fails in 3-5 years instead of 5 – 8 years!

1957 Lyman Runabout Ready for Bottom Paint

1957 lyman runabout bottom paint

Our 1957 23’ Lyman Runabout conservation project just raced past a major milestone.

  • Her much needed stem, knee and gripe Dutchman repairs are complete.
  • Her new quarter-sawn white oak fin keel has been fabricated, sealed with three coats of CPES and installed, bedded in 3M5200.
  • Her bottom has been stripped, after re-clenching the strakes from stem to stern, which was particularly challenging as folks had just applied antifoul over and over, and over again through the years. We found upwards of 3/16” of paint on much of the hull.
  • She was sanded smooth using 80 grit on our Hutchins longboard sanders.
  • Fairing, using 3M Marine Premium Filler is complete, and the entire surface was sanded fair using a Festool random orbit sander and 80 grit followed by 120 grit paper.
  • The ever-challenging seams between the keel and garboards were caulked.
  • She was then sealed up to the waterline with three coats of CPES and primed with two coats of Pettit Special Tie Coat Primer 6627.
  • RJ has stripped and polished the stone guard, prop shaft and rudder.
  • The shiplap transom plank seam was caulked using Interlux Seam Compound for underwater applications.

That said she is ready for the three coats of Pettit Copper Bronze Antifouling bottom paint we will apply next.

Lyman owners have reported, and we have experienced that their round-chine hulls tend to wander when under way, especially at slower speeds. Adding the quarter-sawn white oak fin keel that is typical of many later Lymans addresses this issue simply and in a manner that is consistent with Lyman engineering.

By early next week, when her bottom will have been painted we will move to the topsides, which have been stripped, but not tightened or faired. That is the next milestone, which is now just peeking over the horizon.

1957 Lyman Runabout Bottom Work Update

1957 lyman runabout bottom work

Our 1957 23’ Lyman Runabout’s hull continues to impress us with her originality and condition. Since our last update, RJ and I have focused to prepping the below-waterline strakes, garboards and keel for painting.

We have previously noted the Dutchman repair work awaiting John on the stem, knee and gripe. We have now added Dutchman repair needed on the keel about amidships. And we did find many loose strake fasteners that we tightened or replaced, but we have yet to discover any rot. Our fastener work followed stripping gobs of paint from and tightening the bottom strakes and garboards.

Fairing is next, a project we have nearly completed on port with the application of the third coats of 3M Marine Premium Filler. Starboard will be next.

Then comes sanding everything fair.

John took me to task for suggesting that we will sand with our random orbit, reminding me that, for runs as long as this hull presents, we will sand with our 18” Hutchins longboard sanders. Using the random orbit risks sanding undulations into the surface. (We will use the random orbit for short runs like the below-waterline area of the transom.)

It won’t be long before we are priming the bottom with Pettit Tie Coat Primer 6627 and then applying multiple layers of Sandusky Lyman Copper Bronze Antifouling paint.

1957 Lyman Runabout Post Stripping Update

1957 lyman runabout hull stripping

RJ and I have been challenging our shoulders, first dry-scraping all the loose bottom paint off our 1957 23’ Lyman runabout hull, and then finishing our trek down to bare wood with Jamestown Distributors’ Circa 1850 Heavy Body Paint and Varnish Remover; and yes, so much more scraping. Hours and hours, and gallons and gallons of stripper later, we have, well this video.

I swear someone applied “another couple of coats of antifoul” annually, whether the bottom needed it or not, and, after a point.

What it really needed was what we have just done. Clean it to bare wood; address any fastener, rot or other issues exposed in the process; sand it thoroughly with 80 grit; seal it with Clear Penetrating Epoxy Sealer; and fair the strake/nail edges with 3M Premium Marine Filler.

Now it is time for the Interlux 2000E Two Part Barrier Coat – five coats, followed by Sandusky Paint Company (SANPACO) Copper Bronze Antifouling Paint – at least three coats.

Happily, lying beneath all this “protection” is a hull that remains well-fastened, has zero rot, and that only needs relatively minor repairs. Most of those repairs will be focused on the stem, knee and gripe, with a scant bit of refastening of the garboards where someone once attempted to do so and failed miserably. (Refastening is just not well served by driving new, larger wood screws into old smaller holes. Plugging and then drilling new pilot holes is the only route to a screw that has bitten into and will hold a strake or garboard, or any other hull component in place.

Tomorrow, after we have refastened where necessary, we will begin applying Clear Penetrating Epoxy Sealer – three coats, which adds up to gallons on a hull of this scale. Fairing will follow.

Bottom primer and paint are not too far away!

1957 Lyman Runabout Bilge Steam Cleaning

1957 lyman runabout bilge steam cleaning

Thank you, RJ!

Yes, the sky is blue and the sun is out, but it is November 15, so the sun is not very high in the sky and the “heat wave” 42 degrees Fahrenheit does not help much once he gets wet, which is inevitable.

At the suggestion of her owner, I purchased a North Star industrial water heater, which is designed to “plug” into the outlet valve on the pressure washer and the spray hose. It heats water to 200 degrees Fahrenheit, which materially increases the pressure washer’s effectiveness. “We” begin by applying hot Simple Green Industrial Degreaser, diluted with water to the entire surface and let it steep for 5 – 10 minutes.

Then RJ installs the 25 degree nozzle and goes at it, bathing himself and the bilge with steam in the process.

The entire process took 4 hours, compared to the 10 – 15 it would take us were we using our old school hand scrubbing method.

She’s back in the shop, where we will brace her hull and flip her so we can focus on stripping bottom paint, addressing issues, sealing all surfaces with CPES and painting her anew.

Guess what? The 1940 Lyman yacht tender is waiting for steam cleaning, which RJ will engage shortly.

1957 Lyman Runabout Topside Transom Strip Milestone

1957 lyman runabout topside transom strip

Simply put, there is nothing sexy or exciting about stripping paint and varnish, unless building shoulders and core muscles is your thing! Happily, save for below the waterline and the myriad components we must still strip, the nastiest part of this process is a major milestone that we are thoroughly enjoying fade into our wake.

But it is done! The 1957 23-ft. Lyman runabout’s topsides and transom are bereft of paint, varnish and stain.

We’ve also stripped most of the bottom paint off the first three or so strakes from the waterline down. At the behest of a SMB YouTube Channel subscriber, who swears by a product named Ultra Strip for stripping bottom paint. I bought a gallon for testing, and…

Hmmm, I agree, there are zero VOCs, and its jelly-like consistency hangs on the vertical surface. However….

We tried applying it with a stiff wallpaper brush and with a wide putty knife, and eventually had a thick layer on starboard. After leaving it to “cook” for four hours, per the directions, I tried scraping an area.

Even though there are only two coats of ablative bottom paint below the waterline, very little of it had been softened. We tested at six and eight hours, when, finally, the glop was ready for scraping. Perhaps the worst part of this experience was the maroon-colored glop that made a mess everywhere – Tyvek suits, scrapers, gloves and shoes. As always happens, some of the scrapings dropped outside of the cardboard sheets we laid out to protect the concrete.

Here we had to use a floor scraper, but have been left with stain blotches on the concrete. We applied two successive coats of Circa 1850 Heavy Body Paint and Varnish Remover to the same strakes on starboard, allowed it to “cook” for half an hour, scraped most of the paint down to bare wood, and escaped the maroon lakes we experienced on starboard.

Guess I won’t buy any more Ultra Strip!

She’s back on her trailer until the heating component of our pressure washing system arrives next week. Then we will clean her bilge and all interior framing before we bring her back into the shop for bracing and flipping.

The condition of her hull components continues impressing!

1957 Lyman Runabout Paint Varnish Stripping Update

1957 lyman runabout paint varnish stripping

We are so close to being able to shout, “There! The topside paint and transom varnish are gone!”

Yes, so close, but also just not quite there. We’ve completely stripped the starboard topsides and the transom, but the port topsides have dug in and are battling against our Circa 1850 Heavy Body Paint and Varnish Remover and our Sandvik scrapers.

RJ and I leave each day with ever-stronger, but always tired shoulders and lower backs. But we are about halfway through to watching the exterior stripping challenge fade into our wake … at least the one above the waterline.

Some years back we preserved a 1955 20’ Lyman runabout, for which I kept “score” as I stripped the topsides. When I hit 93 lbs., all I could say was, “This is silly!”

Well, since I’d collected all of the scrapings from starboard into two big garbage bags, why not? They weighed close to 50 pounds in total. Stripping the 8 or so layers of paint has not been our biggest challenge here. Somewhere around layer 4 or 5, someone decided to apply some sort of battleship gray fairing compound to almost the entire topsides.

Yes, on both port and starboard. This stuff is like concrete and takes four applications of the stripper to begin softening.

On the happy news front, what a fantastic hull! She’s 60 years old and there is nary the tiniest spot of rot anywhere, strakes and transom planks included. Moreover we have yet to come upon a clench nail that is other than as tight as the day it was pounded home in Sandusky, OH.

It’s a real honor to be trusted with preserving such an original boat that is in such good shape. I know we will find issues as we keep working, but at least the hull’s major components are straight, true and strong.